9:タッチ・マウスイベント入力
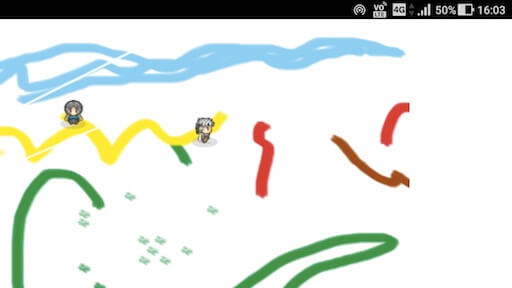
完成形のデモはこんな感じです。
⇒ タッチ操作のデモを見る
タッチ・マウスイベント入力のコード
(2019.3.06執筆)
これまでPCのキーボード入力のみだったのを、タッチイベントやマウスイベントでも操作できるようにしたいと思います。
今回の見通しは、キー入力で使われてるクラス「InputReceiver」を理解すること。
キー入力の流れが理解できれば、そのままタッチ・マウス操作のクラス設計にも応用できるはず。
- InputReceiverを理解する
- TouchReceiverを設計してみる
- mouseイベントを計測してみる
- touchイベントも追加
- touch/mouseイベントでプレイヤー操作
このような手順で、作っていこうと思います。
InputReceiverを理解する
古都さんの弾幕STGより、キー入力に使われてるInputReceiverクラスを参考にします。InputReceiverクラス
class InputReceiver {//実際にキー入力を検知してInputクラスを生成するクラス
    constructor() {
        this._keyMap = new Map();
        this._prevKeyMap = new Map();

        addEventListener('keydown', (ke) => this._keyMap.set(ke.key, true));
        addEventListener('keyup', (ke) => this._keyMap.set(ke.key, false));
    }

    getInput() {
        const keyMap = new Map(this._keyMap);
        const prevKeyMap = new Map(this._prevKeyMap);
        this._prevKeyMap = new Map(this._keyMap);
        return new Input(keyMap, prevKeyMap);
    }
}
addEventListenerでキー入力を受け取って、this._keyMap...(受け取ったキーの配列)に記録するだけのシンプルな役割。
getInput()関数にて、新しいInputクラスを生成し、それを返していることが分かります。
(その際に現在のthis._keyMapをひとつ前の_prevKeyMapにコピーしてることも伺えます)
このInputReceiverクラスは、Gameクラスのconstructor内で登場しています。GameクラスでInputReceiverがどのように扱われてるかも見てみます。
Gameクラス ⇒ InputReceiver
class Game {//いよいよ総まとめです!Gameクラスを作りましょう。Gameクラスはメインループを持ちます
    constructor(title, width, height, maxFps) {
        //〜〜〜〜

        this._inputReceiver = new InputReceiver();
    }
    //〜〜〜〜

    _loop(timestamp) {
        //〜〜〜〜

        const input = this._inputReceiver.getInput();
        this.currentScene.update(info, input);

        requestAnimationFrame(this._loop.bind(this));
    }
}
Gameの流れを追っていくと、Gameのループ内でthis._inputReceiver.getInput();からInputクラスを生成し、各シーンのアップデートを通じて入力情報を渡してることが分かります。
では最後に、Inputクラスとはどのようなものか?確認してみます。
Inputクラス
class Input {//キー入力を保持するだけのクラス
    constructor(keyMap, prevKeyMap) {
        this.keyMap = keyMap;
        this.prevKeyMap = prevKeyMap;
    }

    _getKeyFromMap(keyName, map) {
        if(map.has(keyName)) { return map.get(keyName); }
        else { return false; }
    }
    _getPrevKey(keyName) {
        return this._getKeyFromMap(keyName, this.prevKeyMap);
    }
    getKey(keyName) {
        return this._getKeyFromMap(keyName, this.keyMap);
    }
    getKeyDown(keyName) {
        const prevDown = this._getPrevKey(keyName);
        const currentDown = this.getKey(keyName);
        return (!prevDown && currentDown);
    }
    getKeyUp(keyName) {
        const prevDown = this._getPrevKey(keyName);
        const currentDown = this.getKey(keyName);
        return (prevDown && !currentDown);
    }
}
ちょっと長いですが、よく見たら簡潔なクラスです。
this.keyMapに現在のキー入力情報。this.prevKeyMapに前回のキー入力情報を保持しています。
これにより、現在そのキーが押されているか? ⇒ getKey(keyName)でtrue or falseを返す
キーが押された瞬間か? getKeyDown(keyName)で、前回のキーが押されてない&今回キーが押されてるでtrue。
キーが離された瞬間か? getKeyUp(keyName)で、前回キーが押されてる&今回キーが押されてないでtrue。
一つのキーに対し、3パターンのtrue or false検知ができるようになります。
このことを利用し、update(gameInfo, input)のInputキー入力検知でプレイヤーを動かしたりできる。
例えば、Playerクラスのupdate(gameInfo, input)内にて、矢印キーで移動するコードがこちら。
    update(gameInfo, input) {
        if(input.getKey('ArrowUp')) { this.y -= this.speed; }
        if(input.getKey('ArrowDown')) { this.y += this.speed; }
        if(input.getKey('ArrowRight')) { this.x += this.speed; }
        if(input.getKey('ArrowLeft')) { this.x -= this.speed; }
    }
このようにInputクラスの作りを参考にすれば、一つのマウスポインタに対し、現在マウスボタンが押されてるか? マウスボタンが押された瞬間か? マウスボタンを放した瞬間か?が判定できるようになるでしょう。実際に操作するなら。各update内でマウスポインタの座標も取得する必要がでてきますが。まぁ考えながらやっていくことにします。
TouchReceiverクラスを設計してみる
class TouchReceiver {//画面タッチを検知してTouchクラスを生成するクラス、タッチの検知はgameクラスで行う
    constructor() {
        this._touchMap = {touchdown:false, x:NaN, y:NaN};
        this._prevtouchMap = {touchdown:false, x:NaN, y:NaN};
    }

    getTouch() {
        const touchMap = this._touchMap;
        const prevTouchMap = this._prevtouchMap;
        this._prevTouchMap = this._touchMap;
        return new Touch(touchMap, prevTouchMap);
    }
}
InputReceiverクラスを参考に、タッチ用のReceiverクラスを用意してみました。
このクラスを通じて、タッチ情報を記録します。現在のタッチ情報をthis._touchMapに記録し、アップデート毎にgetTouch()で記録を読み取ってthis._prevtouchMapが上書きされる感じです。
addEventListenerをこのクラスで記述しても良かったのですが、その場合ブラウザ全体でタッチを記録してしまいます。
そうでなく、canvas要素(表示するゲーム画面上)のみで反映させたがいいかな?と思い、canvas要素を定義してるGameクラスに、画面タッチの記録を任せようと思います。
ではGameクラスにてTouchReceiverを用意し、実際にタッチを記録させていきます。
Gameクラス ⇒ constructor内
class Game {//いよいよ総まとめです!Gameクラスを作りましょう。Gameクラスはメインループを持ちます
    constructor(title, maxFps) {
        this.title = title;
        this.maxFps = maxFps;
        this.currentFps = 0;
        this._prevTimestamp = 0;

        this._inputReceiver = new InputReceiver();
        this._touchReceiver = new TouchReceiver(); //タッチレシーバーも用意

        this.screenCanvas = document.createElement('canvas');
        this.screenCanvas.width = screenCanvasWidth;
        this.screenCanvas.height = screenCanvasHeight;

        this.screenCanvas.addEventListener('mousedown', (e) => {
            this._touchReceiver._touchMap = {touchdown:true, x:e.pageX, y:e.pageY};
            console.log('mousedown', this._touchReceiver._touchMap);
        });
        this.screenCanvas.addEventListener('mousemove', (e) => {
            if(this._touchReceiver._touchMap.touchdown){
                this._touchReceiver._touchMap = {touchdown:true, x:e.pageX, y:e.pageY};
                console.log('mousemove', this._touchReceiver._touchMap);
            }
        });
        this.screenCanvas.addEventListener('mouseup', (e) => {
            this._touchReceiver._touchMap = {touchdown:false, x:e.pageX, y:e.pageY};
            console.log('mouseup', this._touchReceiver._touchMap);
        });

        console.log(`${title}が初期化されました。`);
    }
とりあえずGameクラスのconstructor内だけ載せます。
this.screenCanvasでcanvas要素を定義し、this.screenCanvas.addEventListener('mousedown', (e) => {...}とかで、マウスボタンの記録を行えるようにしました。
        this.screenCanvas.addEventListener('mousedown', (e) =>
            this._touchReceiver._touchMap = {touchdown:true, x:e.pageX, y:e.pageY};
        );
        this.screenCanvas.addEventListener('mousemove', (e) => {
            if(this._touchReceiver._touchMap.touchdown){
                this._touchReceiver._touchMap = {touchdown:true, x:e.pageX, y:e.pageY};
            }
        });
        this.screenCanvas.addEventListener('mouseup', (e) =>
            this._touchReceiver._touchMap = {touchdown:false, x:e.pageX, y:e.pageY};
        );
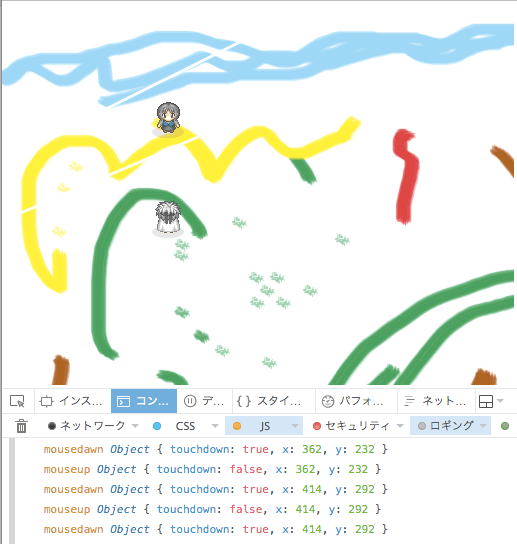
検証用に、それぞれconsole.log('mousedown', this._touchReceiver._touchMap); など付けてると、ブラウザのコンソール画面できちんと確認がとれるようになります。
こんなふうに。。。
マウスクリックが上手く記録されてることが分かりますね。数字で見えたら、どこがミスってるかも把握できて修正しやすいです。
あとは、ゲームループ内でInputと同じようにgetTouch()も追記します。
Gameクラス ⇒ _loop(timestamp)内
    _loop(timestamp) {
        const elapsedSec = (timestamp - this._prevTimestamp) / 1000;
        const accuracy = 0.9; // あまり厳密にするとフレームが飛ばされることがあるので
        const frameTime = 1 / this.maxFps * accuracy; // 精度を落とす
        if(elapsedSec <= frameTime) {
            requestAnimationFrame(this._loop.bind(this));
            return;
        }

        this._prevTimestamp = timestamp;
        this.currentFps = 1 / elapsedSec;
        const gameInfo = new GameInformation(this.title, this.maxFps, this.currentFps);
        const input = this._inputReceiver.getInput();

        const touch = this._touchReceiver.getTouch(); //ここを追加
        this.currentScene.update(gameInfo, input, touch); //ここを修正

        requestAnimationFrame(this._loop.bind(this));
    }
あとはTouchクラスですね。 Touchクラスにて、マウスポインタの座標なり、現在ボタンが押されてるか?の判定がしやすいよう作ってみます。
Touchクラスの定義
class Touch { //現在と一つ前のTouch入力をgameInfoに渡すためのクラス
    constructor(touchMap, prevTouchMap) {
        this.touchMap = touchMap;
        this.prevTouchMap = prevTouchMap;
    }

    get touchDown() { return this.touchMap.touchdown && !this.prevtouchMap.touchdown; }
    get touchUp() { return !this.touchMap.touchdown && this.prevTouchMap.touchdown; }
    get touch() { return this.touchMap.touchdown; }

    get pageX() {return this.touchMap.x;}
    get pageY() {return this.touchMap.y;}
}
ん〜。こんなもんでしょうか。Inputクラスを参考にしてみました。
マウスボタンが押されてるかどうか、押した瞬間か放した瞬間か、それぞれInputの記述を参考にしてます。
    get pageX() {return this.touchMap.x;}
    get pageY() {return this.touchMap.y;}
とりあえず、ポインタの座標を取得できるようにしました。
しかし、この座標には未だ問題が残ってまして...
ちょっとマウスイベント関連の要素をおさらいしてみます。
⇒
MouseEvent Web API
今回は座標の取得にpageX、pageYを使用しています。
このpageX、Yの取得だと、ページ全体の左上を起点として、マウスポインタの座標が割り出されます。
screenCanvasが基準じゃない、よってページ全体の左上に対し、相対的なcanvas要素の位置を割り出さねば、ちょっと数値がズレます。
(マウスだけなら目的の座標をoffsetX、offsetYで得られますが、touchでは現在サポートされてないので統一性を出すため。pageX,Yを採用)
で、要素内のクリック座標を割り出す方法が、こちらのサイトに載ってました。
⇒ タッチした位置を取得する方法 SYNCER
ふむ、この記述を元に、それからスクローラーで画面の座標がずれるのも想定して、マウスポインタ座標の最終調整をSceneクラスのupdate()内で行おうと思います。
Sceneクラス ⇒ update()でのマウスポインタ座標調整
    update(gameInfo, input, touch) {//updateメソッドではシーンに登録されているActor全てを更新し、当たり判定を行い、描画します。描画の前に一度画面全体をクリアするのを忘れないで下さい。
        this._updateInfo(gameInfo, input, touch);//アップデートに追加情報を挿入
        this._updateAll(gameInfo, input, touch);//Actorたちの動きを更新する

        this._qTree.clear();
        this.actors.forEach((a) => {
          this._qTree.addActor(a);
        });
        this._hitTest();//当たり判定を処理する
        this._disposeReleasedActors();//シーンから降ろす役者リスト
        this._clearScreen();//シーンの初期化、描画の前に一度画面全体をクリアする
        this._renderAll();//再描画
    }

    _updateInfo(gameInfo, input, touch) {// アップデートに追加情報を挿入
        gameInfo.sceneName = this.name; // 各アクターに渡すシーンの名前を定義する
        gameInfo.sceneWidth = this.width; // 各アクターに渡すシーンの幅を定義する
        gameInfo.sceneHeight = this.height; // 各アクターに渡すシーンの高さを定義する
        gameInfo.scroller = this.scroller; //プレイヤーにスクロール情報を渡して操作してもらう。

        //タッチ座標の設定。タッチした画面座標に、canvas要素の相対座標や、スクローラー要素を反映させる
        const clientRect = this.renderingTarget.getBoundingClientRect();
        touch.x = touch.pageX - clientRect.left - this.scroller.x - window.pageXOffset;
        touch.y = touch.pageY - clientRect.top - this.scroller.y - window.pageYOffset;
    }
抜粋するとこの部分ですね。ついでにconsole.log(touch.x, touch.y)も入れると、調製した値の確認もできて安心です。
        //タッチ座標の設定。タッチした画面座標に、canvas要素の相対座標や、スクローラー要素を反映させる
        const clientRect = this.renderingTarget.getBoundingClientRect();
        touch.x = touch.pageX - clientRect.left - this.scroller.x - window.pageXOffset;
        touch.y = touch.pageY - clientRect.top - this.scroller.y - window.pageYOffset;

        //console.log(touch.x, touch.y)
canvas右下ギリギリをクリックして見るテスト。
値がきちんと調整されているのがわかります。
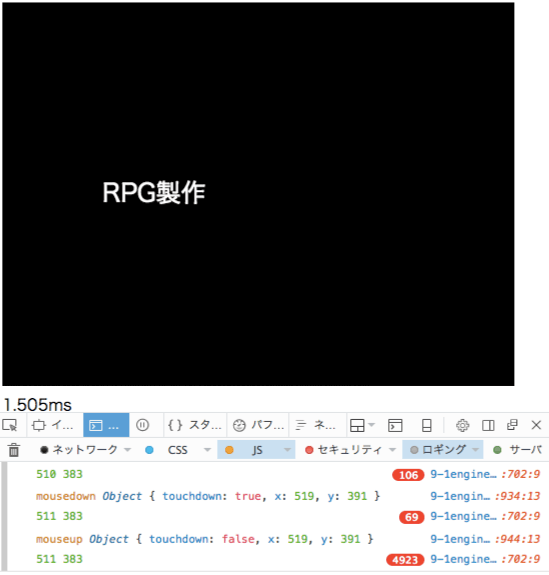
screenCanvasWidth=512
screenCanvasHeight=384
で、0からカウントするため。。
上手く調整された値をtouchに追記できたので、今後ポインタ座標を取得するときはtouch.x、touch.yを使うことになります。PCで確認しやすいマウスポインタで上手く作動したので、合わせてタッチ操作にも対応させてみます。
Gameクラスにタッチイベントも導入
class Game {//いよいよ総まとめです!Gameクラスを作りましょう。Gameクラスはメインループを持ちます
    constructor(title, maxFps) {
        this.title = title;
        this.maxFps = maxFps;
        this.currentFps = 0;
        this._prevTimestamp = 0;

        this._inputReceiver = new InputReceiver();
        this._touchReceiver = new TouchReceiver();

        this.screenCanvas = document.createElement('canvas');
        this.screenCanvas.width = screenCanvasWidth;
        this.screenCanvas.height = screenCanvasHeight;

        //ここからマウスイベント
        this.screenCanvas.addEventListener('mousedown', (e) => {
            this._touchReceiver._touchMap = {touchdown:true, x:e.pageX, y:e.pageY};
            console.log('mousedown', this._touchReceiver._touchMap);
        });
        this.screenCanvas.addEventListener('mousemove', (e) => {
            if(this._touchReceiver._touchMap.touchdown){
                this._touchReceiver._touchMap = {touchdown:true, x:e.pageX, y:e.pageY};
                console.log('mousemove', this._touchReceiver._touchMap);
            }
        });
        this.screenCanvas.addEventListener('mouseup', (e) => {
            this._touchReceiver._touchMap = {touchdown:false, x:e.pageX, y:e.pageY};
            console.log('mouseup', this._touchReceiver._touchMap);
        });

        //ここからタッチイベント
        this.screenCanvas.addEventListener('touchstart', (e) => {
            e.preventDefault();
            this._touchReceiver._touchMap = {touchdown:true, x:e.pageX, y:e.pageY};
            console.log('touchstart', this._touchReceiver._touchMap);
        });
        this.screenCanvas.addEventListener('touchmove', (e) => {
            e.preventDefault();
            this._touchReceiver._touchMap = {touchdown:true, x:e.pageX, y:e.pageY};
            console.log('touchmove', this._touchReceiver._touchMap);
        });
        this.screenCanvas.addEventListener('touchend', (e) => {
            e.preventDefault();
            this._touchReceiver._touchMap = {touchdown:false, x:e.pageX, y:e.pageY};
            console.log('touchend', this._touchReceiver._touchMap);
        });
        this.screenCanvas.addEventListener('touchcancel', (e) => {
            e.preventDefault();
            this._touchReceiver._touchMap = {touchdown:false, x:NaN, y:NaN};
        });
        console.log(`${title}が初期化されました。`);
    }
マウスイベントと同じ感覚で、タッチイベントも読み込めるようにしました。
touchstart、touchmove、touchendなどの参考記事はこちら。
って、この描き方じゃだめだった・・・スマホで確認したらミス!どうやら。座標取得の方法がマウスとは違うみたいです。
e.pageXではなく、e.changedTouches[0].pageXというふうにしないと、タッチ情報を取得できないみたい。
class Game {//いよいよ総まとめです!Gameクラスを作りましょう。Gameクラスはメインループを持ちます
    constructor(title, maxFps) {
        this.title = title;
        this.maxFps = maxFps;
        this.currentFps = 0;
        this._prevTimestamp = 0;

        this._inputReceiver = new InputReceiver();
        this._touchReceiver = new TouchReceiver();

        this.screenCanvas = document.createElement('canvas');
        this.screenCanvas.width = screenCanvasWidth;
        this.screenCanvas.height = screenCanvasHeight;

        this.screenCanvas.addEventListener('mousedown', (e) => {
            this._touchReceiver._touchMap = {touchdown:true, x:e.pageX, y:e.pageY};
            console.log('mousedown', this._touchReceiver._touchMap);
        });
        this.screenCanvas.addEventListener('mousemove', (e) => {
            if(this._touchReceiver._touchMap.touchdown){
                this._touchReceiver._touchMap = {touchdown:true, x:e.pageX, y:e.pageY};
                console.log('mousemove', this._touchReceiver._touchMap);
            }
        });
        this.screenCanvas.addEventListener('mouseup', (e) => {
            this._touchReceiver._touchMap = {touchdown:false, x:e.pageX, y:e.pageY};
            console.log('mouseup', this._touchReceiver._touchMap);
        });

        this.screenCanvas.addEventListener('touchstart', (e) => {
            e.preventDefault();
            this._touchReceiver._touchMap = {touchdown:true, x:e.changedTouches[0].pageX, y:e.changedTouches[0].pageY};
            console.log('touchstart', this._touchReceiver._touchMap);
        });
        this.screenCanvas.addEventListener('touchmove', (e) => {
            e.preventDefault();
            this._touchReceiver._touchMap = {touchdown:true, x:e.changedTouches[0].pageX, y:e.changedTouches[0].pageY};
            console.log('touchmove', this._touchReceiver._touchMap);
        });
        this.screenCanvas.addEventListener('touchend', (e) => {
            e.preventDefault();
            this._touchReceiver._touchMap = {touchdown:false, x:e.changedTouches[0].pageX, y:e.changedTouches[0].pageY};
            console.log('touchend', this._touchReceiver._touchMap);
        });
        this.screenCanvas.addEventListener('touchcancel', (e) => {
            e.preventDefault();
            this._touchReceiver._touchMap = {touchdown:false, x:NaN, y:NaN};
        });
        console.log(`${title}が初期化されました。`);
    }
タイトル画面をタッチすると起動できるようにする
class TitleScene extends Scene {
    constructor(renderingTarget) {
        super('タイトル', screenCanvasWidth, screenCanvasHeight, 'black', renderingTarget);
        const title = new TextLabel(100, 200, 'RPG製作',"white", 25);
        this.add(title);
    }

    update(gameInfo, input, touch) {//ここを変更
        super.update(gameInfo, input, touch);//ここも変更
        if(input.getKeyDown(' ') || touch.touch) { //ここを変更
            const mainScene = new MainScene(this.renderingTarget);
            this.changeScene(mainScene);
        }
    }
}
Playerクラス ⇒ タッチ操作を定義してみる
では、タッチ操作を試してみます。マウスボタン(画面タッチ)が押されてる間、プレイヤーがポインタ座標に向かって移動するようにしてみますか。
    update(gameInfo, input, touch) {

//〜〜〜〜〜〜

            else if(touch.touch) {//isActive = trueでタッチ操作の場合、ポインタ座標に向かって移動できる
                this.isStand = false;
                this.isScrollCustom = false; //タッチ操作時はノーマルスクロールに変更

                //ポインタ座標とプレイヤーの中心座標の差を求める
                const dx = touch.x - this.hitArea.cx; //正の値ならプレイヤー右向き
                const dy = touch.y - this.hitArea.cy; //正の値ならプレイヤー下向き
                const distance = Line.distance(dx,dy); //2点間の距離を求める。
                if (distance > this.sprite.width/2) {//タッチ座標がプレイヤーと重なる場合、移動しない。
                    this._velocityX += dx*this.speed / distance;
                    this._velocityY += dy*this.speed / distance;
                    this.dir = Math.atan2(-dy,dx) * 180 / Math.PI; //2Dベクトルから角度に変換する式で、プレイヤーの向きを変更
                }
            }
//〜〜〜〜続く
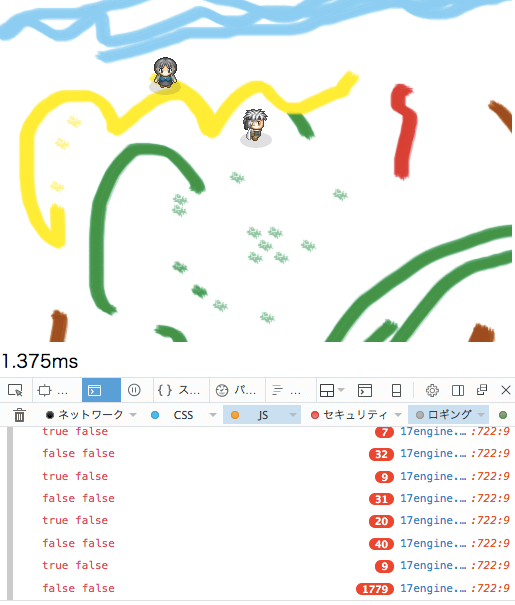
感覚的にこんなもんでしょ。タッチ操作で動くかな?
よし動いたかな。何度か調整してコレでOK。
タッチ操作を主体にするなら、scrollerはノーマルにしといたが良さそうな感じ。
カスタムだとポインタも一緒にずれて操作しづらくなっちゃう。
今の段階で、タッチ操作は補助的な感じに落ち着きました。
タッチ操作も視野にいれると、入力の幅が広がっていいかも。
無事、タッチとマウス入力が実装できました。
(プレイヤーアクションみたいに、タッチ座標にもタッチされましたよ描画させようかな?)
タッチされましたよ描画の記述
タッチを可視化するために、TouchActionクラスを作ってみます。単なる印用です。TouchActionクラスの作成
class TouchAction extends Actor {
    constructor(x, y, color, dir) {
        const hitArea = new Circle(0, 0, 16);
        super(x, y, hitArea, ['touchAction', 'event']);
        this.color = "rgba(250, 250, 200, 0.5)";
        this._dir = dir;
        this.timeCount = 0;

        this.addEventListener('hit', (e) => {
            if(e.target.hasTag('player') && !this.hasTag('playerAction')) { this.tags.push('playerAction'); }
        });
    }
    render(target, scroller) {//オーバーライドしたrenderメソッドで、アクション範囲を可視化してみる
        const context = target.getContext('2d');
        const rect = this.hitArea;
        context.beginPath();
        context.fillStyle = this.color; //シーンの背景色で塗りつぶす
        context.arc(this.x + scroller.x, this.y + scroller.y, 8+(this.timeCount), 0, Math.PI*2, false);
        context.fill();
    }
    update(gameInfo, input, touch) {
        this.timeCount++;
        if(this.timeCount > 8) {this.release();}
    }
}
プレイヤーの位置と描画が重なるとき、playerActionとしても(話しかけたり調べたり)使えるようにしました。
だいぶ操作性良くなるんじゃないかな。タッチのみでも。
Playerクラスの修正
            else if(touch.touch) {//isActive = trueでタッチ操作の場合、ポインタ座標に向かって移動できる
                this.isStand = false;
                this.isScrollCustom = false; //タッチ操作時はノーマルスクロールに変更
                if (this._timeCount % 16 == 0) { //タッチの印を描画。
                    this.spawnActor( new TouchAction(touch.x, touch.y, gameInfo.sceneColor, this._dir ) );
                }
                //ポインタ座標とプレイヤーの中心座標の差を求める
                const dx = touch.x - this.hitArea.cx; //正の値ならプレイヤー右向き
                const dy = touch.y - this.hitArea.cy; //正の値ならプレイヤー下向き
                const distance = Line.distance(dx,dy); //2点間の距離を求める。
                if (distance > this.sprite.width/2) {//タッチ座標がプレイヤーと重なる場合、移動しない。
                    this._velocityX += dx*this.speed / distance;
                    this._velocityY += dy*this.speed / distance;
                    this.dir = Math.atan2(-dy,dx) * 180 / Math.PI; //2Dベクトルから角度に変換する式で、プレイヤーの向きを変更
                }
            }
あとはPlayer側で、タッチされた時にnew TouchAction()するだけ。
これでタッチアクションクラスが生成されます。
後日修正:TouchReceiverのprevTouchMapを認識できるようにする
後日、18項にて会話選択肢をタッチで認識しようとしたとき、初めて気付いた(' '*);;;
問題が一つ発生してました。それはprevTouchMapが正しく認識できてないことです。
前回のtouchがずっとfalse指定のままなので、touchDownした状態か、何もないかの2択しかない。
原因は、オブジェクトはコピーされない!という仕様だからみたいです。
参考 ⇒ 【連載記事】JavaScriptでプログラミングを学ぶ その3:配列とオブジェクト
従来の描き方は、現フレームのタッチ情報と前フレームのタッチ情報とが一色単になってしまっている。或いは上手く引き継がれていない。
もしオブジェクトの情報をコピーする時は、それ用に新しいオブジェクトを生成しなおさなくてはならない。ということでした。
なので、タッチ情報をクラスにまとめて、毎回newするように書き換えます。
修正後のTouchReceiverクラスと、情報を記述するTouchMapクラス
class TouchMap { //タッチを記録するクラス
    constructor(touchdown, x, y) {
        this.touchdown = touchdown;
        this.x = x;
        this.y = y;
    }
}

class TouchReceiver {//画面タッチを検知してTouchクラスを生成するクラス、タッチの検知はgameクラスで行う
    constructor() {
        this._touchMap = new TouchMap(false, NaN, NaN);
        this._prevtouchMap = new TouchMap(false, NaN, NaN);

        //ここから画面クリック情報の読み取り、タッチと両立
        addEventListener('mousedown', (e) => {
            this._touchMap = new TouchMap(true, e.pageX, e.pageY);
        });
        addEventListener('mousemove', (e) => {
            if(this._touchMap.touchdown){
                this._touchMap = new TouchMap(true, e.pageX, e.pageY);
            } else {
                this._touchMap = new TouchMap(false, e.pageX, e.pageY);
            }
        });
        addEventListener('mouseup', (e) => {
            this._touchMap = new TouchMap(false, e.pageX, e.pageY);
        });

        //ここから画面タッチ情報の読み取り、クリックと両立
        addEventListener('touchstart', (e) => {
            e.preventDefault();
            this._touchMap = new TouchMap(true, e.changedTouches[0].pageX, e.changedTouches[0].pageY);
        });
        addEventListener('touchmove', (e) => {
            e.preventDefault();
            this._touchMap = new TouchMap(true, e.changedTouches[0].pageX, e.changedTouches[0].pageY);
        });
        addEventListener('touchend', (e) => {
            e.preventDefault();
            this._touchMap = new TouchMap(false, e.changedTouches[0].pageX, e.changedTouches[0].pageY);
        });
        addEventListener('touchcancel', (e) => {
            e.preventDefault();
            this._touchMap = new TouchMap(false, NaN, NaN);
        });
    }

    getTouch() {
        const prevtouchMap = new TouchMap(this._prevtouchMap.touchdown, this._prevtouchMap.x, this._prevtouchMap.y);
        const touch = new Touch(this._touchMap, prevtouchMap);
        this._prevtouchMap = this._touchMap;
        return touch;
    }
}
従来のTouchReceiverクラス全体を、この新しい記述に差し替えることできちんと認識されるようになりました。
オブジェクトのコピーは、慣れてないとミスしがちかもです。そのためのmapオブジェクトか。。mapの記述を使えたら、たぶんもう少しスマートに描けるんじゃないかなと思います。とりあえずこれで動くのでOKとします。
スマホの表示をネイティブアプリのようにする
さて、一段落つきました。おつかれさまでした。
しかしスマホで操作どんなかな〜と、休憩しながらスマホで見たらこんな状態。
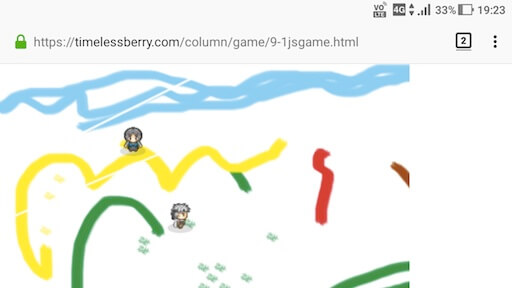
ステータスやURL表示を消したいね、画面幅の調整とかも。
休憩後。。。
とりあえずできることを検索で調べて、やってみる。
どうやらHTMLファイルの方に、記述を加えるみたいだ。
参考
⇒ Webアプリをネイティブアプリのような表示に
⇒ ウェブページをできる限りネイティブアプリっぽく
ホーム画面から開いた時、フルスクリーンで表示(HTML)
<meta name="apple-mobile-web-app-capable" content="yes">これはホーム画面から開くときに有効なようだ。
スマホステータスバーを変更する記述(HTML)
<meta name="apple-mobile-web-app-status-bar-style" content="black">
ホームアイコンの設定
<link rel="apple-touch-icon" href="画像のパス">
アイコンの表示名
<meta name="apple-mobile-web-app-title" content="[app title]">
アプリ起動画面
<link rel="apple-touch-startup-image" href="shared/img/impression480h.png" sizes="320x480" media="(device-height: 480px)">
<link rel="apple-touch-startup-image" href="shared/img/impression480h2X.png" sizes="640x920" media="(device-height: 480px) and (-webkit-device-pixel-ratio: 2)">
<link rel="apple-touch-startup-image" href="shared/img/impression640x1096.png" media="(device-width: 320px) and (device-height: 568px) and (-webkit-device-pixel-ratio: 2)">

<link rel="apple-touch-startup-image" href="shared/img/impression1242×2148.png" media="(device-width: 414px) and (device-height: 736px) and (orientation: portrait) and (-webkit-device-pixel-ratio: 3)">
????長いな
viewportの設定
あとはビューポートの設定かな。画面表示幅を調整する役割<meta name="viewport" content="width=device-width, user-scalable=no, initial-scale=1.0, initial-scale=1, maximum-scale=1">こんな感じで、どうでしょう。 あ。スタイルシートもちょと弄ります。最終調整は後ほど。
スタイルシート
*{margin:0; padding:0;} //canvas画面の余白を無くす
HTMLの修正後コード
<!DOCTYPE html>
<html lang="ja-jp">
<head>
    <meta charset="UTF-8">
    <meta name="viewport" content="width=device-width, user-scalable=no, initial-scale=1.0, initial-scale=1, maximum-scale=1">
    <meta name="apple-mobile-web-app-capable" content="yes">
    <meta name="apple-mobile-web-app-status-bar-style" content="black">
    <meta name="apple-mobile-web-app-title" content="Timelessberry-RPG製作">
    <link rel="apple-touch-icon" href="./images/192-192.png">
    <title>RPGゲーム制作9 タッチ・マウスイベントの設定</title>
<style>
*{margin:0; padding:0;}
</style>
    <script src="./9-1engine.js">
    <script defer src="./9-1danmaku.js">
</head>
<body>
</body>
</html>
Safariでホーム画面に登録してから開く。すると確かにURLバー無しで表示された。
有効なときもあるんでしょうが、ホーム画面登録は一手間ですね。Androidにも対応してないし、どうするかな。。。
次の参考URL ⇒ https://developers.google.com/web/fundamentals/native-hardware/fullscreen/
こちら、Android端末に対応する感じの全画面表示。
どれ。。。おお、Android用のmetaタグもあるのか。
Android用 ホーム画面から開いた時、フルスクリーンで表示(HTML)
<meta name="mobile-web-app-capable" content="yes">とりあえず仕込んでおこう(' '*)
manifest.jsonファイルを作って全画面表示を制御する
<link rel="manifest" href="/manifest.json"> <!--htmlにこの行を記述してmanifest.jsonを読み込む-->manifest.jsonという拡張子のファイルを一から作って、全画面表示を制御する方法もあるらしい。
こちらで狙った表示調整ができそうなので、詳しく見ていきます。、
PC上のテキストエディタから新規作成で「manifest.json」という名のファイルを作ってから始めますか。未だ中身は空です。
manifest.jsonの中身
{
  "short_name": "Timelessberry-RPG製作",
  "name": "Timelessberry-RPG製作",
  "icons": [
    {
      "src": "./images/192-192.png",
      "sizes": "192x192",
      "type": "image/png"
    }
  ],
  "start_url": "./9-1jsgame.html",
  "display": "fullscreen",
  "orientation": "landscape"
}
今は9-1jsgame.htmlで動作確認してるから、こんな感じでいいかな。
("start_url"は、本番でindex.htmlに書き換える予定)
アイコンサイズは192×192対応なので、そのサイズで用意。
ゲームはフルスクリーン表示がいいので、"display": "fullscreen"で。
画面は横向き前提なので、"orientation": "landscape"で。
⇒ マニュフェスト参考リンク
⇒ ウェブアプリ マニュフェスト
後は、HTML側はこんな感じ。
index.htmlの修正後
<!DOCTYPE html>
<html lang="ja-jp">
<head>
    <meta charset="UTF-8">
    <meta name="viewport" content="width=device-width, user-scalable=no, initial-scale=1.0, initial-scale=1, maximum-scale=1">
    <meta name="mobile-web-app-capable" content="yes">
    <meta name="apple-mobile-web-app-capable" content="yes">
    <meta name="apple-mobile-web-app-status-bar-style" content="black">
    <meta name="apple-mobile-web-app-title" content="Timelessberry-RPG製作">
    <link rel="apple-touch-icon" href="./images/192-192.png">
    <link rel="manifest" href="/manifest.json">
    <title>RPGゲーム制作9 タッチ・マウスイベントの設定</title>
<style>
*{margin:0; padding:0;}
</style>
    <script src="./9-1engine.js">
    <script defer src="./9-1danmaku.js">
</head>
<body>
</body>
</html>
AndroidのChromeでホーム画面追加から開くとこんな感じ。横向きに自動でなりました。
後は画面幅なんだが、本格的にやりだすとゲーム作りの趣旨から外れる、この辺で止めときます。
今はPC用途での画面4:3表示だし。スマホも見越すなら16:9のスクリーンサイズなのかなぁ。。。
次回は、当たり判定後のバウンス処理を整理していきます。
⇒ JavaScriptでゲーム作り「10:法線ベクトルと衝突時のバウンス判定」
古都さんのフレームワークを元にほぼ最初から作ってます。
たぶん順番に見ないとちんぷんかんぷん(' '*)...
すぺしゃるさんくす
https://sbfl.net/古都さん
JavaScriptで作る弾幕STGの基礎(フレームワーク)を使わせていただいてます。感謝!
ぴぽやさんもありがとう、キャラチップをお借りしています。
今回の調整分リスト
HTML側は全て載せたので、残りのjsファイル調整分を載せていきます。engine.js
- Touchクラス、TouchReceiverクラスの定義
- GameクラスにTouchReceiver関連を追加
- Sceneクラスにてtouch要素の調整を追記
- 各アクタークラスのupdateに(touch)の代入も追加
- SpriteActorクラスの、スクロール操作を修正
danmaku.js
- Playerクラスに、touch操作を追記
- TouchActionクラスを新規作成
- Titleシーンクラスの修正
engine.js ⇒ Touchクラス、TouchReceiverクラスの定義
//タッチ、マウス操作はTouchクラスで
class Touch { //現在と一つ前のTouch入力をgameInfoに渡すためのクラス
    constructor(touchMap, prevTouchMap) {
        this.touchMap = touchMap;
        this.prevTouchMap = prevTouchMap;
    }

    get touchDown() { return this.touchMap.touchdown && !this.prevtouchMap.touchdown; }
    get touchUp() { return !this.touchMap.touchdown && this.prevTouchMap.touchdown; }
    get touch() { return this.touchMap.touchdown; }

    get pageX() {return this.touchMap.x;}
    get pageY() {return this.touchMap.y;}
}

class TouchReceiver {//画面タッチを検知してTouchクラスを生成するクラス、タッチの検知はgameクラスで行う
    constructor() {
        this._touchMap = {touchdown:false, x:NaN, y:NaN};
        this._prevtouchMap = {touchdown:false, x:NaN, y:NaN};
    }

    getTouch() {
        const touchMap = this._touchMap;
        const prevTouchMap = this._prevtouchMap;
        this._prevTouchMap = this._touchMap;
        return new Touch(touchMap, prevTouchMap);
    }
}
/*
タッチとクリックをまとめて管理するためのクラス群を用意。
ゲームクラスでタッチやクリックを読み取り、Touchクラスに記録して各アップデート関数に渡します。
*/
//タッチ、マウス操作ここまで
engine.js ⇒ GameクラスにTouchReceiver関連を追記
class Game {//いよいよ総まとめです!Gameクラスを作りましょう。Gameクラスはメインループを持ちます
    constructor(title, maxFps) {
        this.title = title;
        this.maxFps = maxFps;
        this.currentFps = 0;
        this._prevTimestamp = 0;

        this._inputReceiver = new InputReceiver();
        this._touchReceiver = new TouchReceiver();

        this.screenCanvas = document.createElement('canvas');
        this.screenCanvas.width = screenCanvasWidth;
        this.screenCanvas.height = screenCanvasHeight;

        this.screenCanvas.addEventListener('mousedown', (e) => {
            this._touchReceiver._touchMap = {touchdown:true, x:e.pageX, y:e.pageY};
            console.log('mousedown', this._touchReceiver._touchMap);
        });
        this.screenCanvas.addEventListener('mousemove', (e) => {
            if(this._touchReceiver._touchMap.touchdown){
                this._touchReceiver._touchMap = {touchdown:true, x:e.pageX, y:e.pageY};
                console.log('mousemove', this._touchReceiver._touchMap);
            }
        });
        this.screenCanvas.addEventListener('mouseup', (e) => {
            this._touchReceiver._touchMap = {touchdown:false, x:e.pageX, y:e.pageY};
            console.log('mouseup', this._touchReceiver._touchMap);
        });

        this.screenCanvas.addEventListener('touchstart', (e) => {
            e.preventDefault();
            this._touchReceiver._touchMap = {touchdown:true, x:e.changedTouches[0].pageX, y:e.changedTouches[0].pageY};
        });
        this.screenCanvas.addEventListener('touchmove', (e) => {
            e.preventDefault();
            this._touchReceiver._touchMap = {touchdown:true, x:e.changedTouches[0].pageX, y:e.changedTouches[0].pageY};
        });
        this.screenCanvas.addEventListener('touchend', (e) => {
            e.preventDefault();
            this._touchReceiver._touchMap = {touchdown:false, x:e.changedTouches[0].pageX, y:e.changedTouches[0].pageY};
        });
        this.screenCanvas.addEventListener('touchcancel', (e) => {
            e.preventDefault();
            this._touchReceiver._touchMap = {touchdown:false, x:NaN, y:NaN};
        });
        console.log(`${title}が初期化されました。`);
    }

    changeScene(newScene) {
        this.currentScene = newScene;
        this.currentScene.addEventListener('changescene', (e) => this.changeScene(e.target));
        console.log(`シーンが${newScene.name}に切り替わりました。`);
    }

    start() {
        requestAnimationFrame(this._loop.bind(this));
    }

    _loop(timestamp) {
const start = performance.now();
        const elapsedSec = (timestamp - this._prevTimestamp) / 1000;
        const accuracy = 0.9; // あまり厳密にするとフレームが飛ばされることがあるので
        const frameTime = 1 / this.maxFps * accuracy; // 精度を落とす
        if(elapsedSec <= frameTime) {
            requestAnimationFrame(this._loop.bind(this));
            return;
        }

        this._prevTimestamp = timestamp;
        this.currentFps = 1 / elapsedSec;
        const gameInfo = new GameInformation(this.title, this.maxFps, this.currentFps);
        const input = this._inputReceiver.getInput();
        const touch = this._touchReceiver.getTouch();
        this.currentScene.update(gameInfo, input, touch);
const end = performance.now();
const timeStr = (end - start).toPrecision(4);
timeCounter.innerText = `${timeStr}ms`;
        requestAnimationFrame(this._loop.bind(this));
    }
}
engine.js ⇒ SceneクラスにTouch座標の調整を追記
class Scene extends EventDispatcher {//Actorをまとめあげる舞台の役割、シーンの定義
    constructor(name, width, height, backgroundColor, renderingTarget) {
        super();

        this.name = name;
        this.width = width;
        this.height = height;
        this.backgroundColor = backgroundColor;
        this.actors = [];
        this._releasedActors = [];
        this.renderingTarget = renderingTarget;

        this._qTree = new LinearQuadTreeSpace(this.width, this.height, 3);
        this._detector = new CollisionDetector();

        // 背景スクローラー用のオブジェクト。アクターの描画位置を調整するのに使用。
        // scroller.xやscroller.yの値はプレイヤー側で操作。アクターのアップデート後、各シーンで画面端の調整する
        this.scroller =  { x: 0, y: 0 };
    }

    add(actor) {//Actorたちを保持する(追加・削除)
        this.actors.push(actor);
        actor.addEventListener('spawnactor', (e) => this.add(e.target));//spawnactorイベントが発生した場合はシーンにActorを追加
        actor.addEventListener('release', (e) => this._addReleasedActor(e.target));//releaseイベントはそのActorを降板リストに追加
    }

    remove(actor) {//Actorを消す関数
        const index = this.actors.indexOf(actor);
        this.actors.splice(index, 1);
    }

    changeScene(newScene) {//Sceneを変更します。ですがScene自身がSceneを変更することはできないので、Actorのときと同じようにイベントだけ発生させて、実際の処理は他のクラスに任せます
        const event = new GameEvent(newScene);
        this.dispatchEvent('changescene', event);
    }

    update(gameInfo, input, touch) {//updateメソッドではシーンに登録されているActor全てを更新し、当たり判定を行い、描画します。描画の前に一度画面全体をクリアするのを忘れないで下さい。
        this._updateInfo(gameInfo, input, touch);//アップデートに追加情報を挿入
        this._updateAll(gameInfo, input, touch);//Actorたちの動きを更新する

        this._qTree.clear();
        this.actors.forEach((a) => {
          this._qTree.addActor(a);
        });
        this._hitTest();//当たり判定を処理する
        this._disposeReleasedActors();//シーンから降ろす役者リスト
        this._clearScreen();//シーンの初期化、描画の前に一度画面全体をクリアする
        this._renderAll();//再描画
    }

    _updateInfo(gameInfo, input, touch) {// アップデートに追加情報を挿入
        gameInfo.sceneName = this.name; // 各アクターに渡すシーンの名前を定義する
        gameInfo.sceneWidth = this.width; // 各アクターに渡すシーンの幅を定義する
        gameInfo.sceneHeight = this.height; // 各アクターに渡すシーンの高さを定義する
        gameInfo.scroller = this.scroller; //プレイヤーにスクロール情報を渡して操作してもらう。

        //タッチ座標の設定。タッチした画面座標に、canvas要素の相対座標や、スクローラー要素を反映させる
        const clientRect = this.renderingTarget.getBoundingClientRect();
        touch.x = touch.pageX - clientRect.left - this.scroller.x - window.pageXOffset;
        touch.y = touch.pageY - clientRect.top - this.scroller.y - window.pageYOffset;
    }

    _updateAll(gameInfo, input, touch) {//Actorたちの動きを更新する
        this.actors.forEach((actor) => actor.update(gameInfo, input, touch));

        this.scroller = gameInfo.scroller; //アップデート後のスクロール情報をシーンに読み込む
        if(this.scroller.x > 0) { this.scroller.x = 0; } //左右スクロール限界を設定
        else if(this.scroller.x < screenCanvasWidth - this.width) { this.scroller.x = screenCanvasWidth - this.width; }
        if(this.scroller.y > 0) { this.scroller.y = 0; } //上下スクロール限界を設定
        else if(this.scroller.y < screenCanvasHeight - this.height) { this.scroller.y = screenCanvasHeight - this.height; }
    }

    _clearScreen() {//シーンの初期化、描画の前に一度画面全体をクリアする
        const context = this.renderingTarget.getContext('2d');
        context.fillStyle = this.backgroundColor;
        context.fillRect(0, 0, screenCanvasWidth, screenCanvasHeight);
    }

    _renderAll() {//updateメソッドで呼び出される _renderAll()で、描画します。
        this.actors.forEach(
            (obj) => obj.render(this.renderingTarget, this.scroller)
        );
    }

    _addReleasedActor(actor) {//降板する役者リストに追加
        this._releasedActors.push(actor);
    }

    _disposeReleasedActors() {//役者を解放する
        this._releasedActors.forEach((actor) => this.remove(actor));//降板する役者をシーンから除外
        this._releasedActors = [];//降板する役者リストを空にする
    }

//〜〜〜〜以下続く
engine.js ⇒ Actorクラスの各updateに(Touch)を追記
class Actor extends EventDispatcher {//EventDispatcherイベント発生関数を持つActorクラスの定義
    constructor(x, y, hitArea, tags = []) {
        super();
        this.hitArea = hitArea;
        this._hitAreaOffsetX = hitArea.x;
        this._hitAreaOffsetY = hitArea.y;
        this.tags = tags;
        this.x = x;
        this.y = y;
    }

    hasTag(tagName) { return this.tags.includes(tagName); } //タグは当たり判定などのときに使います
    get speed() {  return 0; } //現在の移動スピードを取得

    //他のActorを発生させるときに使用
    spawnActor(actor) { this.dispatchEvent('spawnactor', new GameEvent(actor)); }

    //自身をシーンから除外する、しかし関数で自身を消すことはできないので、イベントだけ発生させてより上位のクラスに実際の処理を任せる
    release() { this.dispatchEvent('release', new GameEvent(this)); }

    get x() { return this._x; }//x座標を読み込む関数
    set x(value) {//x座標にvalueを代入する関数
        this._x = value;
        this.hitArea.x = value + this._hitAreaOffsetX;
    }
    get y() { return this._y; }//y座標を読み込む関数
    set y(value) {//y座標にvalueを代入する関数
        this._y = value;
        this.hitArea.y = value + this._hitAreaOffsetY;
    }
    update(gameInfo, input, touch) {}//動く仕組みを作る
    render(target, scroller) {}//...線画処理
}
engine.js ⇒ SpriteActorクラスにてスクロール操作を修正
class SpriteActor extends Actor {//影描画を当てはめた基本のSpriteActor
    constructor(x, y, sprite, hitArea, tags=[]) {
        super(x, y, hitArea, tags);
        this.sprite = sprite;//画像
        this._dir = 270; //アクターの向き...deg表記で。
        this.isHit = 0; // hit中かどうか
        this.isStand = true; //動いていないかどうか
        this.isDash = false; // ダッシュ中かどうか
        this.walkSpeed = 2; //歩くスピード
        this.walkCount = 0; // 移動距離のカウント
        this._velocityX = 0; //フレーム中のx軸の移動値
        this._velocityY = 0; //フレーム中のy軸の移動理

        this.addEventListener('hit', (e) => { //当たり判定発生時のバウンス判定
            const speed = this.speed + e.target.speed;
            const other = e.target.hitArea;
            if(!e.target.hasTag('playerAction') && !e.target.hasTag('event') && !e.target.hasTag('spirit') && !e.target.hasTag('element')) {
                if( this.isHit < 12 ) { this.isHit = 12; }
                if( other.type == 'rectangle') {
                    const dx = other.cx - this.hitArea.cx; //正の値ならこのアクターが左側
                    const dy = other.cy - this.hitArea.cy; //正の値ならこのアクターが上側
                    if (dx > 0 && this.hitArea.right - other.left < this.hitArea.width/2 ) {this._velocityX -= speed;}
                    if (dx < 0 && -this.hitArea.left + other.right < this.hitArea.width/2) {this._velocityX += speed;}
                    if (dy > 0 && this.hitArea.bottom - other.top < this.hitArea.height/2) {this._velocityY -= speed;}
                    if (dy < 0 && -this.hitArea.top + other.bottom < this.hitArea.height/2){this._velocityY += speed;}
                }
                if( other.type == 'circle') {  //円形とのバウンス判定。
                    const dx = this.hitArea.cx - other.cx; //相手中心点のx座標から、自分の中心点のx座標に向かってx軸バウンス
                    const dy = this.hitArea.cy - other.cy; //相手中心点のy座標から、自分の中心点のx座標に向かってy軸バウンス
                    const distance = Line.distance(dx, dy); //2点間の距離
                    this._velocityX += speed * dx / distance;
                    this._velocityY += speed * dy / distance;
                }
                if( other.type=='line') { //壁、線分とのバウンス判定
                    const lineAB = e.target.hitArea; //ライン壁を定義
                    const lineAP = new Line (lineAB.x, lineAB.y, this.hitArea.cx, this.hitArea.cy); //ラインの始点Aから自分の中心位置Pまでの線分
                    const innerAX = lineAB.innerP(lineAP) / (lineAB.length); //線分上の始点Aから、衝突点Xまでの距離を測る=AXの長さ
                    const pointX = {x:lineAB.x + lineAB.dx * innerAX/lineAB.length, y:lineAB.y + lineAB.dy * innerAX/lineAB.length}; //衝突点Xを求める。始点Aから線分ABの単位ベクトルとAXの長さ(innerAX)を掛けあわせた分だけ、xとyを移動した座標。
                    const lineXP = new Line (pointX.x, pointX.y, this.hitArea.cx, this.hitArea.cy); //衝突点Xから中心Pまでのベクトルを引く。(この矢印の向きが、押し戻す方向となる)
                    if(e.target.isFall === false) { //ラインが一方通行かどうかで、ベクトルを絶対値で取るかどうか分ける
                        this._velocityX = (this.walkSpeed+e.target.speed) * lineXP.dx/lineXP.length;
                        this._velocityY = (this.walkSpeed+e.target.speed) * lineXP.dy/lineXP.length;
                    } else {
                        this._velocityX = Math.abs((this.walkSpeed+e.target.speed) * lineXP.dx/lineXP.length);
                        this._velocityY = Math.abs((this.walkSpeed+e.target.speed) * lineXP.dy/lineXP.length);
                    }
                }
            }
        });
    }

    get speed() {
        if (this.isStand) { return 0; } //直立姿勢の時は0
        else if(this.isHit === 0) { return (this.walkSpeed + this.isDash * 4); } //移動スピードを取得。ダッシュ中はベース値に+4、
        else {return 1;} //Hit判定時は歩行スピード
        }
    get dir() { return this._dir; }
    set dir(value) { this._dir = value; } //後の拡張クラスで、sprite画像の向きを変えるときなどに上書きします
    get dirR() { return this._dir * Math.PI/180; } //現在の向きをラジアンの角度で取得

    bgScrollX(scroller) { //背景スクロールのX軸移動(基本はプレイヤーのupdate()内で使用)最後の調整はシーン側で行ってます
        let scrollPX
        if(!this.isScrollCustom) { scrollPX = - this.hitArea.cx + screenCanvasWidth/2; } //x座標のノーマルスクロール
        else{ scrollPX = -this.hitArea.cx + screenCanvasWidth/2 - 84 * Math.round(Math.cos(this.dirR)); }//カスタムスクローラー本来のx座標
        if ( this.isHit < 1 || Math.abs(this._velocityX) > 2) {
            scroller.x -= this._velocityX; //プレイヤーに合わせてx座標を移動(バウンス判定などで移動距離が短い場合、何もしない)
        }
        if (scroller.x + this.walkSpeed*4/3 < scrollPX) { scroller.x += this.walkSpeed*4/3; return; } //画面の縦横比でx軸移動の比を調整
        else if (scroller.x - this.walkSpeed*4/3 > scrollPX) { scroller.x -= this.walkSpeed*4/3; return; }
        else if (scroller.x + 1 < scrollPX) { scroller.x += 1; return; } //差がわずかの時は1だけ移動
        else if (scroller.x - 1 > scrollPX) { scroller.x -= 1; return; }
        else { scroller.x = scrollPX; return; }
    }
    bgScrollY(scroller) { //背景スクロールのY軸移動(基本はプレイヤーのupdate()内で使用)最後の調整はシーン側で行ってます
        let scrollPY
        if(!this.isScrollCustom) { scrollPY = - this.hitArea.cy + screenCanvasHeight/2; } //y座標のノーマルスクロール
        else{ scrollPY = -this.hitArea.cy + screenCanvasHeight/2 + 63 * Math.round(Math.sin(this.dirR)); }//カスタムスクローラー本来のy座標
        if ( this.isHit < 1 || Math.abs(this._velocityY) > 2 ) {
            scroller.y -= this._velocityY; //プレイヤーに合わせてy座標を移動(バウンス判定などで移動距離が短い場合、何もしない)
        }
        if (scroller.y + this.walkSpeed < scrollPY) { scroller.y += this.walkSpeed; return; }
        else if (scroller.y - this.walkSpeed > scrollPY) { scroller.y -= this.walkSpeed; return; }
        else if (scroller.y + 1 < scrollPY) { scroller.y += 1; return; } //差がわずかの時は1だけ移動
        else if (scroller.y - 1 > scrollPY) { scroller.y -= 1; return; }
        else { scroller.y = scrollPY; return; }
    }

    render(target, scroller) {//オーバーライドしたrenderメソッドでは、canvasのdrawImageメソッドを使って自身を描画
        const context = target.getContext('2d');
        const rect = this.sprite; //キャラクターsprite画像

        context.beginPath(); //ここから影の描画
        context.fillStyle = "rgba(100,100,100,0.2)"
        context.ellipse(this.hitArea.cx + scroller.x, this.hitArea.bottom-1 + scroller.y,
            this.sprite.width/2, this.sprite.height/5, 0, 0, 2 * Math.PI);
        context.fill(); //影の描画ここまで

        context.drawImage(this.sprite.image, //ここからsprite画像の描画
            rect.x, rect.y,
            rect.width, rect.height,
            this.x + scroller.x, this.y + scroller.y , // アクターの描画位置を、スクローラーの座標分ずらして調整
            rect.width, rect.height); //sprite画像ここまで
    }

    update(gameInfo, input, touch) {
        this.x += this._velocityX;
        this.y += this._velocityY;
        this.walkCount += Math.sqrt(this._velocityX*this._velocityX + this._velocityY*this._velocityY);

        //ここから4行プレイヤーが枠外にはみ出さないよう調整
        if(this.x < 0) { this.x = 0; }
        if(this.y < 0) { this.y = 0; }
        if(this.x > gameInfo.sceneWidth - this.sprite.width) { this.x = gameInfo.sceneWidth - this.sprite.width; }
        if(this.y > gameInfo.sceneHeight - this.sprite.height) { this.y = gameInfo.sceneHeight - this.sprite.height; }

        //各種パラメータの初期化処理
        this._velocityX = 0;
        this._velocityY = 0;
        if(this.isHit !== 0) {this.isHit -= 1;}
    }
}
danmaku.js ⇒ PlayerクラスにTouch操作を追記
class Player extends SpriteActor {
    constructor(x, y, dir=90, isActive = true) {
        const sprite = new Sprite(assets.get('player'), 32, 96, 32, 32);
        const hitArea = new Rectangle(6, 4, 20, 28);
        super(x, y, sprite, hitArea, ['player']);
        this.isActive = isActive; //今、キー入力を受け付けるかどうか
        this.isScroll = true; //今、画面スクロールをさせるかどうか
        this.isScrollCustom = true; //カスタムスクロールか?
        this.isScrollCustomPrev = true; //元の設定がカスタムスクロールか?
        this._dir = dir; //最初の向きを指定値で上書き、指定漏れの場合、初期値は90度にしている。
        this._dirGo = 0; //進む方角...移動方向に使うので、deg表記の角度°にπ/180をかけた値を用いる。初期値は0だけどすぐ変わるだろう。
        this.walkSpeed = 2;
        this._timeCount = 0;
    }

    get speed() {
        if (this.isStand) { return 0; } //直立姿勢の時は0
        else if(this.isHit === 0) { return (this.walkSpeed + this.isDash * 4); } //移動スピードを取得。ダッシュ中はベース値に+4、
        else {return 1;} //Hit判定時は歩くスピード
        }

    get dir() { return this._dir; }
    set dir(value) { this._dir = value; //プレイヤーの向きが変わった時、画像も差し替え
                     if (-45 <= value && value <= 45 || 315 <= value ) { this.sprite.y = this.sprite.height*2; return; } //画像右向き
                     else if (45 < value && value < 135) { this.sprite.y = this.sprite.height*3; return; } //画像上向き
                     else if (135 <= value && value <= 225 || value <= -135) { this.sprite.y = this.sprite.height; return; } //画像左向き
                     else if (-135 < value && value < -45 || 225 < value ) { this.sprite.y = 0; return; } //画像下向き
                   }

    update(gameInfo, input, touch) {
        if(input.getKeyDown('Shift')) { this.isDash = !this.isDash; } //Shiftキーでダッシュ?歩行の切り替え

        //歩行カウントが一定以上に達した時、歩くモーションを変化
        if(this.walkCount % 128 > 0) { this.sprite.x = this.sprite.width; }
        if(this.walkCount % 128 > 32) { this.sprite.x = this.sprite.width*2; }
        if(this.walkCount % 128 > 64) { this.sprite.x = this.sprite.width; }
        if(this.walkCount % 128 > 96) { this.sprite.x = 0; }

        //立ち止まった時に直立姿勢
        if( !input.getKey('ArrowUp') && !input.getKey('ArrowDown') && !input.getKey('ArrowRight') && !input.getKey('ArrowLeft') && !touch.touch) {
            this.sprite.x = this.sprite.width; this.isStand = true;
        }

        if(this.isActive) {//isActive = trueでアクション可
            if(!touch.touch) {//タッチ操作でない場合、キーで移動できる
            //矢印キーを押しただけの時に、プレーヤーの向きを変える。
              if(!input.getKey(' ')) {
                if(input.getKey('ArrowUp')) { this.dir = 90;} //上
                if(input.getKey('ArrowRight')) { this.dir = 0;} //右
                if(input.getKey('ArrowDown')) { this.dir = -90;} //下
                if(input.getKey('ArrowLeft')) { this.dir = 180; } //左
                if(input.getKey('ArrowUp') && input.getKey('ArrowRight')) { this.dir = 45;} //右上
                if(input.getKey('ArrowDown') && input.getKey('ArrowRight')) { this.dir = -45;} //右下
                if(input.getKey('ArrowDown') && input.getKey('ArrowLeft')) { this.dir = -135;} //左下
                if(input.getKey('ArrowUp') && input.getKey('ArrowLeft')) { this.dir = 135;} //左上
              }
              //進む方角の設定
              if( input.getKey('ArrowUp') || input.getKey('ArrowDown') || input.getKey('ArrowRight') || input.getKey('ArrowLeft')) {
                this.isStand = false;
                if(input.getKey('ArrowUp')) { this._dirGo = Math.PI/2;} //上 90*Math.PI/180
                if(input.getKey('ArrowRight')) { this._dirGo = 0;} //右 0*Math.PI/180
                if(input.getKey('ArrowDown')) { this._dirGo = - Math.PI/2;} //下 -90*Math.PI/180
                if(input.getKey('ArrowLeft')) { this._dirGo = Math.PI; } //左 180*Math.PI/180
                if(input.getKey('ArrowUp') && input.getKey('ArrowRight')) { this._dirGo = Math.PI/4;} //右上 45 * Math.PI/180
                if(input.getKey('ArrowDown') && input.getKey('ArrowRight')) { this._dirGo = - Math.PI/4;} //右下 -45 * Math.PI/180
                if(input.getKey('ArrowDown') && input.getKey('ArrowLeft')) { this._dirGo = -3 * Math.PI/4;} //左下 -135 * Math.PI/180
                if(input.getKey('ArrowUp') && input.getKey('ArrowLeft')) { this._dirGo = 3 * Math.PI/4;} //左上 135 * Math.PI/180
              }
              //矢印キーを押してる間、進む方角に移動させる
              if(input.getKey('ArrowUp') || input.getKey('ArrowDown') || input.getKey('ArrowRight') || input.getKey('ArrowLeft')) {
                this._velocityX += this.speed * Math.cos(this._dirGo);
                this._velocityY += -this.speed * Math.sin(this._dirGo);
                if(this.isScrollCustomPrev) { this.isScrollCustom = true; } //設定がカスタムスクロールなら、それに変更
              }
            }
            else if(touch.touch) {//isActive = trueでタッチ操作の場合、ポインタ座標に向かって移動できる
                this.isStand = false;
                this.isScrollCustom = false; //タッチ操作時はノーマルスクロールに変更
                if (this._timeCount % 16 == 0) { //タッチの印を描画。
                    this.spawnActor( new TouchAction(touch.x, touch.y, gameInfo.sceneColor, this._dir ) );
                }
                //ポインタ座標とプレイヤーの中心座標の差を求める
                const dx = touch.x - this.hitArea.cx; //正の値ならプレイヤー右向き
                const dy = touch.y - this.hitArea.cy; //正の値ならプレイヤー下向き
                const distance = Line.distance(dx,dy); //2点間の距離を求める。
                if (distance > this.sprite.width/2) {//タッチ座標がプレイヤーと重なる場合、移動しない。
                    this._velocityX += dx*this.speed / distance;
                    this._velocityY += dy*this.speed / distance;
                    this.dir = Math.atan2(-dy,dx) * 180 / Math.PI; //2Dベクトルから角度に変換する式で、プレイヤーの向きを変更
                }
            }

            //スペースキーでアクション発生
            if(input.getKeyDown(' ')) {
                const targetX = this.hitArea.cx + this.sprite.width * Math.cos(this.dirR);
                const targetY = this.hitArea.cy - this.sprite.height * Math.sin(this.dirR);
                this.spawnActor( new PlayerAction(this.hitArea.cx, this.hitArea.cy, targetX, targetY, this._dir ) );
            }
        }//if(isActive)

        //座標移動
        this.x += this._velocityX;
        this.y += this._velocityY;

        //ここから4行プレイヤーが枠外にはみ出さないよう調整
        if(this.x < 0) { this.x = 0; this._velocityX = 0;}
        if(this.y < 0) { this.y = 0; this._velocityY = 0;}
        if(this.x > gameInfo.sceneWidth - this.sprite.width) { this.x = gameInfo.sceneWidth - this.sprite.width; this._velocityX = 0;}
        if(this.y > gameInfo.sceneHeight - this.sprite.height) { this.y = gameInfo.sceneHeight - this.sprite.height; this._velocityY = 0;}

        //歩数カウント
        this.walkCount += Math.sqrt(this._velocityX*this._velocityX + this._velocityY*this._velocityY);

        //背景スクローラーの調整
        if (this.isScroll) { this.bgScrollX(gameInfo.scroller); this.bgScrollY(gameInfo.scroller); }

        if (this.isHit !== 0) { this.isHit -= 1; }//アップデートの最後にHit判定カウントを1つリセット
        this._velocityX = 0;//アップデートの最後にx軸の移動距離をリセット
        this._velocityY = 0;//アップデートの最後にy軸の移動距離をリセット
        this._timeCount++;
    }
}
danmaku.js ⇒ TouchActionを新規作成
class TouchAction extends Actor {
    constructor(x, y, color, dir) {
        const hitArea = new Circle(0, 0, 16);
        super(x, y, hitArea, ['touchAction', 'event']);
        this.color = "rgba(250, 250, 200, 0.5)";
        this._dir = dir;
        this.timeCount = 0;

        this.addEventListener('hit', (e) => { //プレイヤーと重なるとき、プレイヤーアクションとしても使えるように
            if(e.target.hasTag('player')) { this.tags.push('playerAction') }
        });
    }
    render(target, scroller) {//オーバーライドしたrenderメソッドで、アクション範囲を可視化してみる
        const context = target.getContext('2d');
        const rect = this.hitArea;
        context.beginPath();
        context.fillStyle = this.color; //シーンの背景色で塗りつぶす
        context.arc(this.x + scroller.x, this.y + scroller.y, 8+(this.timeCount), 0, Math.PI*2, false);
        context.fill();
    }
    update(gameInfo, input, touch) {
        this.timeCount++;
        if(this.timeCount > 8) {this.release();}
    }
}
danmaku.js ⇒ TitleSceneを修正
class TitleScene extends Scene {
    constructor(renderingTarget) {
        super('タイトル', screenCanvasWidth, screenCanvasHeight, 'black', renderingTarget);
        const title = new TextLabel(100, 200, 'RPG製作',"white", 25);
        this.add(title);
    }

    update(gameInfo, input, touch) {
        super.update(gameInfo, input, touch);
        if(input.getKeyDown(' ') || touch.touch) {
            const mainScene = new MainScene(this.renderingTarget);
            this.changeScene(mainScene);
        }
    }
}