17:canvas描画を最適化する
動作に最も負荷のかかるcanvas描画をどのように最適化するか。メッセージ表示用のcanvasをどうするか?
(2019.6.28執筆、2021.11.06更新)
ひとまずメッセージウィンドウの機能が実装できました。1文字ずつテキストを表示していくのに、従来はウィンドウ用に複数のcanvas画面を重ねて追加しておりましたが、そのせいで表示が重いのなんの;;; やはりcanvas画面は一つにまとめたほうが良いかと考えてました。ならばメッセージウィンドウクラス自身には非表示のcanvasContextを独自に持たせて、そこから描画データのみを引っ張ってくればどうか?というアイデアに行き着きます。
参考 ⇒ HTML5 canvas のパフォーマンスの改善 - HTML5 Rocks
二つ目に、最先端の描画技術にあたるWebGL(ver.2)ですね。。。
通常の2d描画ではなくWebGLの技術に置き換えるだけで、かなりのパフォーマンス改善が見込まれるようです。 canvasContextのメソッドをいずれにも対応できるよう、ここで下準備を行います。
いきなりWebGLは敷居(面倒さ加減)が高いので、この章では未だWebGLを扱いません。 たぶんある程度ゲームの枠組みが完成してから取り掛かると思います。
今回のコラムの狙い
- 画面領域外のcanvasを用いたメッセージウィンドウのcontextの最適化
- canvasの描画メソッドを(WebGLの採用を見越して)振り分けられるようにする
- 各シーン、各アクターの描画関連メソッドの調整
まずはメッセージウィンドウのcanvasを最適化してみます。
メッセージウィンドウに独立した領域外のcanvasを持たせる
これまでのMessageWindowクラスの問題点として、update内にて外部からcanvasを読み込んでからでないとテキスト部分の調整ができないことでした。 しかしこのクラスに独自のcanvasを持たせることで、任意のタイミングでテキスト表示の調整ができるようになります。そしてこの独自canvas要素はページに追加することなく、画像ファイルのように描画データだけ切り取ってゲーム本体のcanvasに追加することができるのです!
メッセージウィンドウ枠を非表示のcanvasに描画しておいて、フレーム更新時に描画データを貼り付けるだけ。という手法。 ウィンドウ枠は描画更新の必要性が薄いので、この方法を用いると描画メソッドがデータ貼り付け1回で済み、相当なcanvas負荷軽減になります。
自身のcanvasContextを参照しながら処理が進むので、結果スッキリとしたコードにまとまるのも素晴らしいです。。
MessageWindowクラスの修正後のコード
class MessageWindow extends WindowUI {//メッセージウィンドウの管理と会話送り
    constructor(allMessages) {
        super(['messageWindow']);
        this.color = "#555"; //テキスト色の初期値
        this.baseSize = 15; //テキストサイズの初期値
        this.fontStyle = "sans-serif"
        this.lineHeight = this.baseSize * 1.5; //段落の高さ。フォントサイズに対する高さ比で算出

        this.fade = 1/16; //フェード効果の値...+でフェードイン、-でフェードアウトに切り替え
        this.opacity = 0; //描画の透明度。最初は0で透明に。メッセージをフェードイン表示させる

        this.margin = 2; //画面端からウィンドウ描画の間隔をどれくらいあけるか?
        this.paddingLeft = 20; //画面左からテキストをどれくらい開けるか?
        this.nameHeight = 30; //名前表示用のウィンドウ高さ
        this.windowWidth = screenCanvasWidth - this.margin*2; //現在508 ウィンドウ枠の幅をどれくらいとるか
        this.windowHeight = 100; //ウィンドウ枠の高さをどれくらいとるか

        //前もって画面領域外に描画しておくためのcanvasContext
        this.preCanvas = document.createElement('canvas');
        this.preCanvas.width = screenCanvasWidth; //メッセージ欄の幅はそのまま画面の横幅
        this.preCanvas.height = this.windowHeight + this.margin*1.5 + this.nameHeight; //メッセージ欄で使うcanvas高さの合計
        this.preContext = this.preCanvas.getContext('2d');

        this.windowX = this.margin; //左画面端から余白(=margin)がウィンドウ描画位置のX座標にもなる
        this.windowY = screenCanvasHeight - this.preCanvas.height; //ウィンドウ描画位置のY座標

        this._timeCount = 0; //次の表示までの経過フレーム数。会話のテンポをとるのに使用。0より大きい値ならアップデート毎に-1し、0になるまでテキストを更新しない。
        this.allMessages = allMessages; //全てのメッセージオブジェクトが格納された配列
        this.currentMessage = this.allMessages.shift(); //今表示するべきメッセージオブジェクト、全メッセージリストの先頭を取り出した値

        //会話終了時にウィンドウを破棄&プレイヤー操作再開
        this.addEventListener('textEnd', () => { this.close(); this.playerIsActive(); });
    }

    get currentMessage() { return this._currentMessage; }
    set currentMessage(message) { //会話フェーズの移行と、各要素の初期化
        if(message === undefined) { // もう空っぽだったらtextEndイベントを発生させる
            this._currentMessageText = ''; // undefinedのままだと一瞬undefinedが描画されるかもしれないので…
            this.dispatchEvent('textEnd'); return;// textEndイベントを発行
        }
        this._currentMessage = message; //↓現在の会話内容が更新される際、一旦表示要素をリセットする。
        this.currentMessageText = this._currentMessage.text.shift(); //テキストの配列から、現在ウィンドウに表示する会話フェーズを取り出す
        if(!this._currentMessage.illust) { this.textMaxWidth = 472; } //テキストの最大表示幅、キャラ立ち絵なしのとき472
        else { this.textMaxWidth = 332; } //立ち絵ありのとき332

        this.clearPreRendering(); //ウィンドウ枠全体を初期化
        this.preRenderingBoard(); //メッセージボードを描画
        this.preRenderingName(); //名前表示欄を描画
        this.inited = false; //ウィンドウ枠の初期化済み=false
    }
    get currentMessageText() { return this._currentMessageText; }
    set currentMessageText(str) { //会話フェーズ内のテキスト内容の移行と初期化
        if(str === undefined) {
            this.currentMessage = this.allMessages.shift(); return;// 次のテキストが見つからない場合、次の会話フェーズに移行する
        }
        this._currentMessageText = str;
        this.textNumber = 0; //今表示するのはcurrentMessageTextの何番目の文字?
        this.line = 0; //現在のテキスト文字は、ウィンドウの何段目に表示する?
        this.nowTextWidth = 0; //現在表示されてるテキスト幅を測るのに使用
        this.heightPlus = 0; //テキスト表示位置の高さの微調整に使用
        this.heightPlusArray = null; //その段落の高さ調整分の値を配列に記録。初期値null
        this.size = this.baseSize; //フォントサイズも初期化
        this.rubySize = this.baseSize * 5 / 8;  //ふりがなのフォントサイズ
        this.rubyX = null; //ふりがなを宛てる漢字は何文字?というのを保持するための要素,,,ふりがな描画するモードかどうかの判定も兼ねる
        this.ruby = 0; //ふりがなのひらがなの文字数をカウント
        this.messageSizeCheck(); //段落ごとの最大フォントサイズをチェック
        this.clearPreRenderingBoard(); //メッセージ欄のみ初期化
    }

    messageSizeCheck() { //ここから、段落ごとの最大フォントサイズをチェック
        const checkNum1 = this.currentMessageText.indexOf("#<"); //フォントを大きくする特殊文字が含まれないなら-1が代入される
        if(checkNum1 === -1) {return;} // フォントを大きくする記述がないならそのままでOK
        else { /*#<文字列が含まれるなら最大フォントサイズチェック!*/
            let count = 0;
            let maxSize = this.baseSize; //初期値15
            let nowSize = this.baseSize; //初期値15
            let textWidth = 0;
            let heightPlus = 0;
            this.heightPlusArray = []; //この値を求めるための↓長ったらしい関数。その段落の高さ調整分をthis.heightPlus[this.line]で取り出せる形にするのに、こんな行数かかってしまうとは。。しかし表示を綺麗にするにはしゃーないのか。文字サイズ弄らなければ無駄に動くこともないし、いいか...(' '*)
            while(count < this.currentMessageText.length) {
                const char = this.currentMessageText.charAt(count);
                let char2;
                if(char === "#") { count++; //取り出した文字が#の場合、次の一文字を調べる。関数が登録されてる文字列の場合無視
                    char2 = this.currentMessageText.charAt(count);
                    if(char2 === "n") {
                        heightPlus += maxSize - this.baseSize; // this.baseSize=15;
                        this.heightPlusArray.push(heightPlus); checkWidth = 0; maxSize = nowSize;
                    }
                    else if(char2 === "<") { nowSize += 3; if(nowSize > maxSize) {maxSize=nowSize;} }
                    else if(char2 === ">") { nowSize -= 3; }
                }
                if(char !== "#" || char2 === "#") { //ここで取り出した1文字が#でない場合と、##で続いた場合の#を拾える
                    this.preContext.font = `${nowSize}px ${this.fontStyle}`;
                    const charWidth = this.preContext.measureText(char).width;
                    const nextCheckWidth = textWidth + charWidth;
                    if( nextCheckWidth > this.textMaxWidth ) {  //表示するテキスト幅がtextMaxWidthを超えるとき、判定1行終わり、高さ調整の判定値を配列に追加。
                        heightPlus += maxSize - this.baseSize; // this.baseSize=15;
                        this.heightPlusArray.push(heightPlus); textWidth = 0; maxSize = nowSize;
                    }
                    textWidth += charWidth;
                }
                count++;
            }
            heightPlus += maxSize - this.baseSize; // this.baseSize=15;
            this.heightPlusArray.push(heightPlus);  //全ての文字を表示した場合の、最後の段落判定
        }
    }

    updateText() { //表示テキストを1文字ずつ追加するメソッド
        if(!this.rubyX) { //ふりがな描画モードでないなら、通常の文字の処理
          const char = this.currentMessageText.charAt(this.textNumber); //このアップデートで表示するべき1文字を取り出す
          const frameSkip24 = ["。", "?", "…"]; //この後に表示間隔を24フレーム開ける文字列を定義(0.4秒)
          const frameSkip12 = ["、"]; //この後に表示間隔を12フレーム開ける文字列を定義(0.2秒)
          if( frameSkip24.indexOf(char) > -1 ) {this._timeCount = 24;} //現在の文字が、その文字列のいずれかと一致した場合24フレーム開ける
          else if( frameSkip12.indexOf(char) > -1 ) {this._timeCount = 12;}

          if(char === "#") { this.textNumber++; //取り出した文字が#の場合、次の一文字を調べる。#の直後に特定の文字列だった場合に、対応する関数を記述
            const char2 = this.currentMessageText.charAt(this.textNumber);
            if(char2 === "n") { this.line++; this.nowTextWidth = 0; } //"#n"で、自動的に改行する。段落を変更したら、これまでのテキスト幅は0に。
            else if(char2 === "<") { this.size += 3; this.rubySize += 1; } /* "#<"でフォントサイズを3大きく、ふりがなを1大きくする*/
            else if(char2 === ">") { this.size -= 3; this.rubySize -= 1; } // "#>"でフォントサイズを3小さく、ふりがなを1小さくする
            else if(char2 === "=") { this.size = 15; this.rubySize = 6; } // "#="でフォントサイズを元の大きさにする
            else if(char2 === "^") { this.heightPlus -= 3; } // "#^"でフォント位置を上に3ずらす
            else if(char2 === "v") { this.heightPlus += 3; } // "#v"でフォント位置を下に3ずらす
            else if(char2 === "r") { this.color = "#c64";} //"#r"でフォント色を赤に
            else if(char2 === "b") { this.color = "#555";} //"#b"でフォント色を元の黒いグレーに戻す
            else if(char2 === ".") { this._timeCount = 12; } //"#."で次の文字の表示ラグを12フレーム(1/5秒)開ける
            else if(char2 === "[") { this.textNumber++; //ふりがなを宛てる開始位置(ふりがなモードON) 例:振仮名#[3,ふりがな]という記述を想定している
                const char3 = this.currentMessageText.charAt(this.textNumber); //[の次は、ふりがな宛て先の「漢字文字数」が指定されている。この要素は数字。!isNaN(char)
                this.rubyX = char3; this.textNumber++; //以後、今回のふりがなモードではthis.rubyXが漢字(宛先)の文字数を表す
            }
            else if(char2 === "#") {this.preRenderingText(char2);} //##で続く場合、2文字目の#を普通に描画する
          }
          else {this.preRenderingText(char);} //#でないなら、取り出した1文字を普通に描画する
          this.textNumber++; //描画処理が終わったら、表示テキスト番号を次のカウントに振る
       }
       else if(this.rubyX) {//ふりがな描画モードなら、ふりがな専用の処理を適用
       let rubyStr = ""; //rubyStrという要素に、先の"ふりがな"文字列を格納する
         for(let count = 0; count < 31; count++) { //さすがに31文字以上の「ふりがな」は無いだろう。"]"で処理を終了するし
           const char = this.currentMessageText.charAt(this.textNumber);
           this.textNumber++;
           if(char === "]") {break;} //"]"でふりがなモードを終了。それ以外ならふりがな一文字を追加して次のふりがなへ
           rubyStr += char; this.ruby++;
           }
         this.preRenderingRuby(rubyStr); //ふりがなを描画するメソッド
         this.rubyX = false; this.ruby = 0; //描き終わった後の、ふりがなモードを終了(リセット)するための記述
       }
    }

    clearPreRendering() { //メッセージボードのプリ描画領域をクリアする
        this.preContext.clearRect(0, 0, this.preCanvas.width, this.preCanvas.height);  //名前表示&テキストスペースクリア
    }
    preRenderingBoard() { //最初にメッセージボードを描画する
        this.preContext.fillStyle = 'rgba(255,255,255,0.99)'; //塗りつぶす色は白';
        this.preContext.strokeStyle = 'rgba(125,125,255,0.99)'; //枠は青っぽい
        this.preContext.fillRect(this.margin, this.margin + this.nameHeight, this.windowWidth, this.windowHeight);
        this.preContext.strokeRect(this.margin, this.margin + this.nameHeight, this.windowWidth, this.windowHeight);
    }
    clearPreRenderingBoard() { //メッセージボードをリセットする(テキスト領域のみクリア)
        this.preContext.fillStyle = 'rgba(255,255,255,0.99)'; //塗りつぶす色は白';
        const padding = this.margin*2;
        this.preContext.clearRect(padding, padding + this.nameHeight, this.windowWidth - padding, this.windowHeight - padding);
        this.preContext.fillRect(padding, padding + this.nameHeight, this.windowWidth - padding, this.windowHeight - padding);
    }
    preRenderingName() { //会話の最初に名前を描画する関数
        if(!this.currentMessage.name || this.currentMessage.name === "") {return;} //名前がないなら表示しない
        this.preContext.font = `${this.size}px ${this.fontStyle}`;
        const nameWidth = this.preContext.measureText(this.currentMessage.name).width; //名前表示の文字列の長さを取得

        const width = nameWidth + this.paddingLeft*2;
        const height = this.nameHeight + this.margin; //this.nameHeightは、constructor内にて30に設定
        this.preContext.fillStyle = 'rgba(255,255,255,1.0)'; //塗りつぶす色は白
        this.preContext.strokeStyle = 'rgba(125,125,255,0.99)'; //枠は青っぽい
        this.preContext.fillRect(this.margin, this.margin, width, height);
        this.preContext.strokeRect(this.margin, this.margin, width, height - this.margin);
        this.preContext.fillRect(this.margin+1, this.nameHeight +1, width - 2, 2); //白枠の延長

        this.preContext.fillStyle = "#063";
        const textX = this.margin + this.paddingLeft; //テキスト描画位置のX座標 =「枠の左端から20」をカウント
        const textY = this.nameHeight - 5; // Y座標 =「枠の上端から5上にカウント
        this.preContext.fillText(this.currentMessage.name, ~~textX, ~~textY); //テキスト描画の関数本体
    }
    preRenderingText(char) { //ここからテキスト描画メソッド
        const nextTextWidth = this.nowTextWidth + this.preContext.measureText(char).width; //テキスト幅を更新した後の値を先読み
        if( nextTextWidth > this.textMaxWidth ) {  //表示するテキスト幅がtextMaxWidthを超えるとき、自動的に改行する。
            this.line++; this.nowTextWidth = 0; //段落を変更したら、これまでのテキスト幅は0に。
        }
        this.preContext.font = `${this.size}px ${this.fontStyle}`;
        this.preContext.fillStyle = `${this.color}`;
        if(this.nowTextWidth === 0 && this.heightPlusArray) { this.heightPlus += this.heightPlusArray[this.line]; } //段落最初に判定、この行の最大文字サイズで、表示位置の高さを調整
        //1文字毎にテキストを描画
        const textX = this.margin + this.paddingLeft + this.nowTextWidth; //テキスト描画位置のX座標 =「枠の左端から20」に、これまでのテキスト幅をカウント
        const textY = this.nameHeight + 32 + this.lineHeight * this.line + this.heightPlus; // Y座標 =「枠の上端から30開ける」に、現在の段落*段落分の高さをカウント
        this.preContext.fillText(char, ~~textX, ~~textY); //テキスト描画の関数本体
        this.nowTextWidth += this.preContext.measureText(char).width; //表示テキスト幅に現在の文字の幅分を追加
    }
    preRenderingRuby(char) { //ここからテキスト描画メソッド
        this.preContext.font =`${this.rubySize}px ${this.fontStyle}`;
        this.preContext.fillStyle = `${this.color}`;

        const rubyHiraganaWidth = this.rubySize * this.ruby; //ふりがなの描画の幅(描画位置の調整に必要な値)
        const rubyTextWidth = this.rubyX * this.size; //ふりがな宛先のテキスト幅(描画位置の調整に必要な値2)
        const rubyRelativeX = (rubyTextWidth - rubyHiraganaWidth) * 0.5 - rubyTextWidth; //ルビ描画位置のX軸方向の調整値を計算
        const textX = this.margin + this.paddingLeft + this.nowTextWidth + rubyRelativeX; //テキスト描画位置のX座標 = 元の基準値に、これまでのテキスト幅をカウントし、調整幅分だけ左にずらす
        const textY = this.nameHeight + 32 + this.lineHeight * this.line + this.heightPlus - this.size + 1; // Y座標描画位置 = 元の基準値に、現在の段落*段落分の高さをカウント
        this.preContext.fillText(char, textX, textY); //テキスト描画の関数本体
    }

    update(gameInfo, input, touch) { //毎フレーム呼び出されるupdateメソッド。このクラスのプログラム動作の本体
        this.playerIsStay(); //メッセージウィンドウが存在する限り、プレイヤー操作を止める
        if(this.opacity !== 1){ //会話フェーズが切り替わるならウィンドウ枠全体の初期化
            this.inited = true;
            return;
        }
        if( this.currentMessageText.length < this.textNumber) { //現在の会話の文字数すべて表示されてるなら
            if(input.getKey(' ') || touch.touch) {  //スペースキーorタッチを押した時に
                this.currentMessageText = this._currentMessage.text.shift(); // 次のメッセージに移行
            }
        }
        else if( this._timeCount === 0 ) {
            this.updateText();
            if( (input.getKey(' ') || touch.touch) && this.textNumber > 3) { let count = 0; //スペースキーorタッチで一度に最大10文字まで更新、会話更新のボタンと被るので、最初の3文字まではスキップしない。
                while( count < 5 && (input.getKey(' ') || touch.touch) && this._timeCount == 0 && this.currentMessageText.length >= this.textNumber) {
                    this.updateText(); count++;
                }
                if(this._timeCount > 0) { this._timeCount >> 1; } //スペースキーが押されてるなら、タイムラグを半分の時間(端数切り捨て)に
            }
        }
        else if(this._timeCount > 0) {this._timeCount--;}
    }

    renderingCharactor(context) { //立ち絵表示は、通常のcanvasContextにて行う
        const sprite = this._currentMessage.illust;
        if(sprite === undefined) {return;} //立ち絵がない時はテキスト表示の最大幅を広げる
        context.drawImage(sprite.image, //ここからsprite画像の描画
            sprite.x, sprite.y,
            sprite.width, sprite.height,
            screenCanvasWidth - sprite.width, 0
        ); //sprite画像ここまで
    }

    render(context) { //前もってpreCanvasに描画しておいたのを、実際のゲーム画面に貼り付ける
        if( (this.fade > 0 && this.opacity < 1) || (this.fade < 0 && this.opacity > 0) ) {
            this.opacity += this.fade;
            context.setAlpha(this.opacity);
            this.renderingCharactor(context);
            context.setAlpha(1);
        }
        else {
            context.drawImage(this.preCanvas, 0, 0, this.preCanvas.width, this.preCanvas.height, 0, this.windowY);
            this.renderingCharactor(context);
        }
    }
}
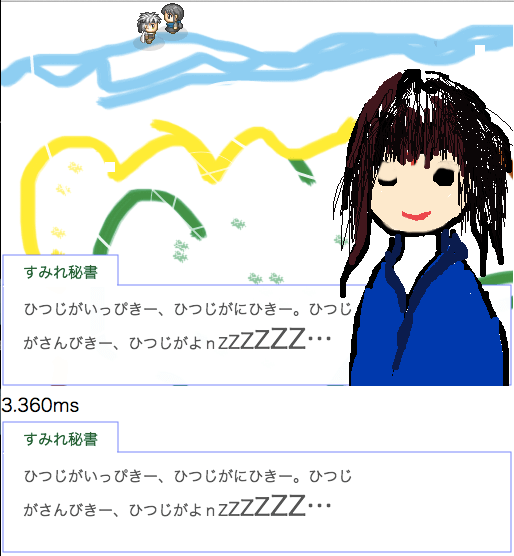
画像では分かるように可視化させました、要は画面領域外にてメッセージウィンドウの描画データだけ構築しておいて、後でそれを貼り付けるだけ。たったこれだけのことでパフォーマンス改善はもちろん、シーンcanvasへの依存がなくなりスッキリとしたコードにまとまります。
テキストに関連するcanvasで尚且つ画面領域外なので、メッセージウィンドウに持たせるのは通常の2dContextで十分。後述するWebGLのためのcanvasは、ここには挟まなくて良いでしょう。
2D描画からWebGLに変換する下準備
次にcanvas描画が2dにもWebGLにも後から対応できるよう、プログラム内で直にcanvasを扱うのではなく、間で描画関連メソッドを一括管理できるrenderContextクラスを作成しておこうと思います。 canvasのラッピングにあたって、古都さんのこちらの記事を参考にしました。いつもありがとうです(uu*)⇒ JavaScriptでFlashのような表示システムを構築する
RenderContextCanvasクラスのコード
class RenderContextCanvas {
    constructor(canvas) {
        this._canvas = canvas;
        this._context = canvas.getContext('2d');
    }
    clear() {
        this._context.setTransform(1, 0, 0, 1, 0, 0);
        this._context.clearRect(0, 0, this._canvas.width, this._canvas.height);
    }
    clearRect(x, y, width, height) {
        this._context.setTransform(1, 0, 0, 1, 0, 0);
        this._context.clearRect(x, y, width, height);
    }
    beginPath() { this._context.beginPath(); }
    strokeColor(color) { this._context.strokeStyle = color;}
    fillColor(color) { this._context.fillStyle = color; }
    stroke() { this._context.stroke(); }
    fill() { this._context.fill(); }

    setAlpha(value) {
        const num = Math.max(0, Math.min(1, value)); //最小値0、最大値1で指定
        this._context.globalAlpha = num;
    }

    lineWidth(value) { this._context.lineWidth = value; }

    //描画位置のx座標とy座標は、~~で小数点以下を切り捨てています。整数指定で描画パフォーマンスを最適化させるため
    line(x, y, x1, y1) {
        this._context.moveTo(~~x, ~~y);
        this._context.lineTo(~~x1, ~~y1);
    }
    quadraticCurve(x, y, x1, y1, x2, y2) {
        this._context.moveTo(~~x, ~~y);
        this._context.quadraticCurveTo(~~x1, ~~y1, ~~x2, ~~y2);
    }
    bezierCurve(x, y, x1, y1, x2, y2, x3, y3) {
        this._context.moveTo(~~x, ~~y);
        this._context.bezierCurveTo(~~x1, ~~y1, ~~x2, ~~y2, ~~x3, ~~y3);
    }

    rect(x, y, width, height) { this._context.rect(~~x, ~~y, width, height); }
    circle(x, y, radius) { this._context.arc(~~x, ~~y, radius, 0, Math.PI * 2); }
    ellipse(x, y, radiusX, radiusY, rotation = 0, startAngle = 0, endAngle = 2 * Math.PI) { //楕円の描画
        this._context.ellipse(~~x, ~~y, radiusX, radiusY, rotation, startAngle, endAngle);
    }
    drawImage(spriteImg, spriteX, spriteY, width, height, x, y) {//sprite画像の描画
        this._context.drawImage(
            spriteImg, spriteX, spriteY, width, height, //スプライト画像の切り取り範囲
            ~~x, ~~y, width, height //画像の描画位置
        );
    }

    font(fontStyle) { this._context.font = fontStyle; }
    fillText(text, x, y) { this._context.fillText(text, ~~x, ~~y); }

    rotate(angle) { this._context.rotate(angle); }
}
各アクターの描画メソッドは、このクラスを通じたメソッドで呼び出され、ゲーム画面に描画される形になります。
ゲーム中のcanvasContextは、このRenderContextCanvasクラスにGame.canvasを代入する形で、各シーンへ渡すようにします。 試しにGameクラスにて用意した一つのcanvasを置き換えてみましょう。
GameクラスにRenderContextCanvasを割り当てる
class Game {
    constructor(title, maxFps) {
        this.title = title;
        this.maxFps = maxFps;
        this.currentFps = 0;
        this._prevTimestamp = 0;

        this._inputReceiver = new InputReceiver();
        this._touchReceiver = new TouchReceiver();

        //画面描画用のキャンパス
        const canvas = document.createElement('canvas');
        canvas.width = screenCanvasWidth;
        canvas.height = screenCanvasHeight;
        this.canvas = canvas; //これをHTML要素に追加
        this.canvasContext = new RenderContextCanvas(canvas); //これを各シーンに渡す

        console.log(`${title}が初期化されました。`);
    }
このキャンバスが、新しいクラスを導入した形になります。
        const canvas = document.createElement('canvas');
        canvas.width = screenCanvasWidth;
        canvas.height = screenCanvasHeight;
        this.canvas = canvas; //これをHTML要素に追加
        this.canvasContext = new RenderContextCanvas(canvas); //これを各シーンに渡す
RolePlayingGameにて、各シーンにcontextを渡す
class RolePlayingGame extends Game {
    constructor() {
        super('RPG製作', 60);
        const titleScene = new TitleScene(this.canvasContext);
        this.changeScene(titleScene);
    }
}
assets.addImage('player', 'images/chara_player.png');
assets.addImage('npc1', 'images/chara_npc1.png');
assets.addImage('bg0', 'images/backimage0.png');
assets.addImage('up_npc_girl0', 'images/up_npc_girl0.png');
assets.addImage('up_npc_girl1', 'images/up_npc_girl1.png');

assets.loadAll().then((a) => {
    const game = new RolePlayingGame();
    document.body.appendChild(game.canvas); //ここはthis.canvasで
    document.body.appendChild(timeCounter);
    game.start();

    global.player = new Player(150, 200, 90); //globalオブジェクトに、player: new Player();のプロパティを追加。global.playerでアクセス可能に!
});
これにてcanvasContextを中間ラップできました。 後は、仕様変更による不具合を修正していけばOKです。
各シーン、各アクターの描画関連メソッドの調整
プログラム全体の仕様変更のときは、前回までの状態をコピーしておくと安心。最悪どうしようもなくなったとしても、以前の状態に戻せばいいだけですから。 未だ規模が小さいので小回りがきく段階です。基礎となるゲームシステム作りにおいて、成果を大きく前進させるよりも、確実に、少しずつ、先を見越した調整を優先します。地道にコンソールのエラーを見ながら、不具合を修正していくとします。
タッチ座標を、canvasとの相対位置に合わせる記述
タッチ座標は、表示ページに対するcanvas領域の相対位置によってタッチ座標の調整が必要になります(基本0が望ましいですが)... 前回まではscrollerと合わせて、各シーンにてTouch座標を調整してました。しかしrenderingContextCanvasクラスを通じてシーンに渡してるため、従来の手順は踏めません。一度Gameクラス内でタッチ座標を調整しておきたいと思います。Gameクラス _loop()内の修正
    _loop(timestamp) {
        const elapsedSec = (timestamp - this._prevTimestamp) /1000;
        const accuracy = 0.9; // あまり厳密にするとフレームが飛ばされることがあるので
        const frameTime = 1 / this.maxFps * accuracy; // 精度を落とす
        if(elapsedSec <= frameTime) { //メインループ内ではfps 制限をかけています。通常requestAnimationFrameは60fpsで実行されますが、例えば120Hzのモニタを使っていると 120fpsで実行される可能性があります。つまり倍速で動きます。なので制限があったほうがいいでしょう。
            requestAnimationFrame(this._loop.bind(this));
            return;
        }

        this._prevTimestamp = timestamp;
        const input = this._inputReceiver.getInput();
        const touch = this._touchReceiver.getTouch();
        const clientRect = this.canvas.getBoundingClientRect(); //タッチ座標をcanvasの位置に合わせて調整
        touch.x = touch.pageX - clientRect.left - window.pageXOffset; //x座標を調整した値を保存
        touch.y = touch.pageY - clientRect.top - window.pageYOffset; //y座標を調整した値を保存

        this.currentScene.update(input, touch);
        requestAnimationFrame(this._loop.bind(this));
    }
touch.x = touch.pageX - clientRect.left - window.pageXOffset; //x座標を調整した値を保存
touch.y = touch.pageY - clientRect.top - window.pageYOffset; //y座標を調整した値を保存
この値は、ウィンドウの選択肢...或いはメニュー画面などでタッチ操作をするときに必要です。 そのまま保持できるようにしておきます。
Sceneクラスの内部調整
主に調整が必要なのはSceneクラスでしょう。今回の仕様変更で- windowUI用のキャンバスが必要なくなった(各シーンクラス共通)
- actor用canvasが、唯一のcanvasContextに変更された(各シーンクラス共通)
- windowUIのアップデートと描画は、アクターと同様別々に行うことにした
- タッチ座標のスクローラー調整は、アクター用に別途行う
- render(描画)メソッドの調整
修正箇所...結構な数にのぼります(' '*);
Sceneクラス修正後のコード
class Scene extends EventDispatcher {//Actorをまとめあげる舞台の役割、シーンの定義
    constructor(name, width, height, bgImageName, canvasContext) {
        super();

        this.name = name;
        this.backgroundImage = assets.get(`${bgImageName}`); //背景画像の指定、nullの場合は黒く塗りつぶす

        // 背景スクローラー用のオブジェクト。アクターの描画位置を調整するのに使用。
        // scroller.xやscroller.yの値はプレイヤー側で操作。アクターのアップデート後、各シーンで画面端の調整する
        this.scroller =  { x: 0, y: 0 };

        this.infomation = {width, height, //アクターの各アップデートに渡すシーン情報をまとめたオブジェクト
            scroller:this.scroller,
            playerIsActive:true //現在プレイヤー操作が可能かどうかを定義
        };

        this.actors = [];
        this._releasedActors = [];
        this.windowsUI = [];
        this._closedWindowsUI = [];

        this.canvasContext = canvasContext;

        this._qTree = new LinearQuadTreeSpace(this.width, this.height);
        this._detector = new CollisionDetector();
    }

    changeScene(newScene) {//Sceneを変更します。ですがScene自身がSceneを変更することはできないので、Actorのときと同じようにイベントだけ発生させて、実際の処理は他のクラスに任せます
        this.dispatchEvent('changescene', new Event(newScene));
    }

    add(actor) {//Actorたちを保持する(追加・削除)
        this.actors.push(actor);
        actor.addEventListener('spawnactor', (e) => this.add(e.target));//spawnactorイベントが発生した場合はシーンにActorを追加
        actor.addEventListener('release', (e) => this._releasedActors.push(e.target));//releaseイベントはそのActorを降板リストに追加
        actor.addEventListener('openWindow', (e) => this.open(e.target));//openWindowイベントが起こったら、シーンにメッセージウィンドウを追加
    }
    open(windowUI) {//(メッセージ)ウィンドウを保持する(追加・削除)
        this.windowsUI.push(windowUI);
        windowUI.addEventListener('openWindow', (e) => this.open(e.target));//openWindowイベントが発生した場合はシーンにWindowを追加
        windowUI.addEventListener('close', (e) => this._closedWindowsUI.push(e.target));//closeイベントはそのWindowを降板リストに追加
        windowUI.addEventListener('playerIsStay', () => this.infomation.playerIsActive = false);//プレイヤーの操作を受け付けないようにする
        windowUI.addEventListener('playerIsActive', () => this.infomation.playerIsActive = true);//プレイヤーの操作を再度可能にする
    }
    _disposeReleasedActors() {//役者を解放する関数
        this._releasedActors.forEach((actor) => {
            const index = this.actors.indexOf(actor); //指定されたActorは、配列の何番目? 見つからない時は-1を返す
            if(index > -1) {this.actors.splice(index, 1);} //見つからない場合(-1)のときは何もしない、インデックス番号が0以上の時、その番号の要素を削除する
        });//降板する役者をシーンから除外
        this._releasedActors = [];//降板する役者リストを空にする
    }
    _disposeClosedWindowsUI() {//メッセージウィンドウを閉じる関数
        this._closedWindowsUI.forEach((windowUI) => {
            const index = this.windowsUI.indexOf(windowUI);
            if(index > -1) {this.windowsUI.splice(index, 1);}
        });//閉じるウィンドウをシーンから除外
        this._closedWindowsUI = [];//閉じるリストを空にする
    }

    update(input, touch) {//updateメソッドではシーンに登録されているActor全てを更新し、当たり判定を行い、描画します。描画の前に一度画面全体をクリアするのを忘れないで下さい。
        this._updateInfo(input, touch);//アップデートに追加情報を挿入
        this._updateAll(this.infomation, input, touch);//ActorやWindowUIの動きを更新する

        this._qTree.clear();
        this.actors.forEach((a) => this._qTree.addActor(a)); //hittest四分木空間に各アクターを振り分け
        this._hitTest();//当たり判定を処理する

        this._disposeReleasedActors();//役目を終えたActorをシーンから降ろす
        this._disposeClosedWindowsUI();//役目を終えたウィンドウを閉じる

        this._renderAll(this.canvasContext);//各アクターとウィンドウUIをシーンに再描画する
    }

    _updateInfo(input, touch) {// アップデートに追加情報を挿入
        //タッチ座標の設定。タッチした画面座標にスクローラー要素を反映させる
        touch.actorX = touch.x + this.scroller.x;
        touch.actorY = touch.y + this.scroller.y;
    }

    _updateAll(sceneInfo, input, touch) {//Actorオブジェクトの動作を更新する
        this.actors.forEach((actor) => actor.update(sceneInfo, input, touch));

        if(this.scroller.x < 0) { this.scroller.x = 0; } //左右スクロール限界を設定
        else if(this.scroller.x > sceneInfo.width - screenCanvasWidth) { this.scroller.x = sceneInfo.width - screenCanvasWidth; }
        if(this.scroller.y < 0) { this.scroller.y = 0; } //上下スクロール限界を設定
        else if(this.scroller.y > sceneInfo.height - screenCanvasHeight) {this.scroller.y = sceneInfo.height - screenCanvasHeight; }

        this.windowsUI.forEach((windowUI) => windowUI.update(sceneInfo, input, touch));
    }

    _clearRendering(context) { //アクター描画の前に画面表示をリセット
        if(!this.backgroundImage) {//背景画像が指定されてない場合、黒く塗りつぶす。
            context.fillColor("black");
            context.beginPath();
            context.rect(0, 0, screenCanvasWidth, screenCanvasHeight);
            context.fill();
        }
        else { //背景が設定されてるなら、背景画像のセット
            context.drawImage(this.backgroundImage, //ここから背景画像の描画
            this.scroller.x, this.scroller.y, //背景画像を、スクローラーの座標分ずらして調整
            screenCanvasWidth, screenCanvasHeight,
            0, 0 // 背景の描画開始位置は0で固定
            ); //背景画像ここまで}
        }
    }
    _renderAll(context) {
        //各アクターのrender()メソッドを呼び出して、描画します。
        this.actors.forEach((obj) => obj.render(context, this.scroller));

        //各ウィンドウUIのrender()メソッドを呼び出して、描画します。
        this.windowsUI.forEach((obj) => obj.render(context));
    }

    _hitTest(currentIndex = 0, objList = []) {
      const currentCell = this._qTree.data[currentIndex];
      this._hitTestInCell(currentCell, objList);
      let hasChildren = false;
      for(let i = 0; i < 4; i++) {
        const nextIndex = (currentIndex << 2) + 1 + i;
        const hasChildCell = (nextIndex < this._qTree.data.length) && (this._qTree.data[nextIndex] !== null);
        hasChildren = hasChildren || hasChildCell;
        if(hasChildCell) {
          objList.push(...currentCell);
          this._hitTest(nextIndex, objList);
        }
      }

      if(hasChildren) {
        const popNum = currentCell.length;
        for(let i = 0; i < popNum; i++) { objList.pop(); }
      }
    }

    _hitTestInCell(cell, objList) {
      const length = cell ? cell.length : 0;
      const cellColliderCahce = new Array(length);
      if(length > 0) { cellColliderCahce[0] = cell[0].hitArea; }

      for(let i=0; i < length - 1; i++) {
        const obj1 = cell[i];
        const collider1  = cellColliderCahce[i];
        for(let j=i+1; j < length; j++) {
          const obj2 = cell[j];
          let collider2;
          if(i === 0) {
            collider2 = obj2.hitArea;
            cellColliderCahce[j] = collider2;
          } else {
            collider2 = cellColliderCahce[j];
          }
          const hit = this._detector.detectCollision(collider1, collider2);

          if(hit) {
            obj1.dispatchEvent('hit', new Event(obj2, hit));
            obj2.dispatchEvent('hit', new Event(obj1, hit));
          }
        }
      }

      const objLength = objList.length;
      const cellLength = cell ? cell.length : 0;
for(let i=0; i各シーンに、一番下に表示する背景画像を設定できるようにしました。
class Scene extends EventDispatcher {//Actorをまとめあげる舞台の役割、シーンの定義
    constructor(name, width, height, bgImageName, canvasContext) {
        super();

        this.name = name;
        this.backgroundImage = assets.get(`${bgImageName}`); //背景画像の指定、nullの場合は黒く塗りつぶす
    _clearRendering(context) { //アクター描画の前に画面表示をリセット
        if(!this.backgroundImage) {//背景画像が指定されてない場合、黒く塗りつぶす。
            context.fillColor("black");
            context.beginPath();
            context.rect(0, 0, screenCanvasWidth, screenCanvasHeight);
            context.fill();
        }
        else { //背景が設定されてるなら、背景画像のセット
            context.drawImage(this.backgroundImage, //ここから背景画像の描画
            this.scroller.x, this.scroller.y, //背景画像を、スクローラーの座標分ずらして調整
            screenCanvasWidth, screenCanvasHeight,
            0, 0 // 背景の描画開始位置は0で固定
            ); //背景画像ここまで}
        }
    }
ちなみに画面クリアとして黒く塗りつぶす描画の場合、context.beginPath();を入れないと不具合が起こります。2dCanvas標準のfillRectに慣れてると抜けがちになるので注意です。
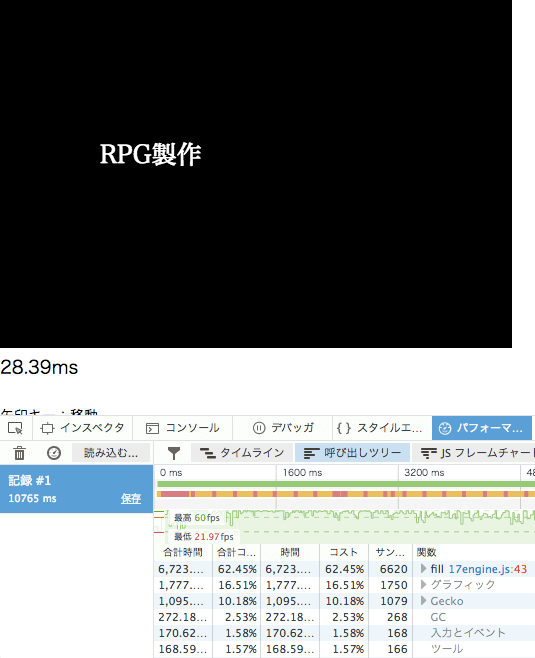
(beginPath()を忘れて起こった不具合 ⇒ どんどん処理時間が遅くなる。パフォーマンス計測で原因を見つけるしか無い...)
Actorのrender()メソッド調整
では最後にActor側の調整です。renderメソッドを新しく作ったrendercontextクラスに合わせて記述を修正していきます。 fillStyleやstrokeStyleの記述を調整するところは、テキストエディタの文字列検索で行う。細かい部分は、実際にデモを見ながらの修正が早いと思えます。
- プレイヤー操作時に参照するタッチ座標の修正
- プレイヤーアクション、タッチアクションの描画
- SpriteActorの描画
- 矩形アクターの描画
- 円形アクターの描画
- 線分アクターの描画
- 多角形アクターの描画
- 二次曲線アクターの描画
- 三次曲線アクターの描画
- テキストラベルアクターの描画
そもそもRenderContextCanvasクラスの描画メソッドは各アクターからとってきてるので、調整は同時進行でした。
⇒ 調整後のデモをみる
だいたいこんなもんか。無事に全部の形状が表示されればOKです。
次 ⇒ JavaScriptでゲーム作り「17_EX2:会話立ち絵のフェードイン・アウト」
古都さんのフレームワークを元にほぼ最初から作ってます。
たぶん順番に見ないとちんぷんかんぷん(' '*)...
すぺしゃるさんくす
https://sbfl.net/古都さん
JavaScriptで作る弾幕STGの基礎(フレームワーク)を使わせていただいてます。感謝!
ぴぽやさんもありがとう、キャラチップをお借りしています。