16:会話時に立ち絵、名前を表示させる
今回はメッセージウィンドウと一緒に、キャラクターの立ち絵と名前を表示する機能を実装します。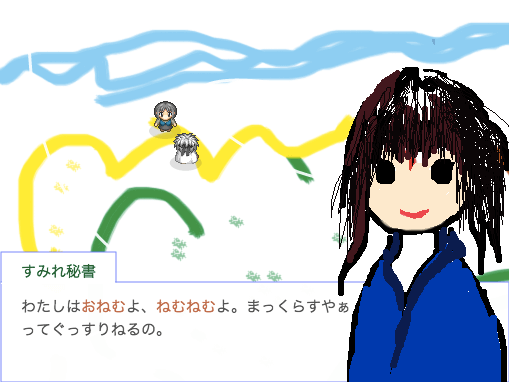
⇒ 立ち絵表示の完成形デモ(スペースキーでアクション)
会話時にキャラ立ち絵、名前を表示させる機能
(2019.6.18執筆、2021.11.06更新)
15項にて、テキストウィンドウの表示機能は大体揃えました。後はセリフを話すキャラクターの名前と立ち絵表示、そしてゆくゆく実装予定のボイス機能も視野に入れて。 MessageWindowクラスを拡張していきます。また、その際にセリフを用意する側のNPCクラスも、表示名や表情を切り替えやすいよう、前もって準備が必要でしょう。
今回のプログラミングの手順
- NPCクラスの拡張、キャラクター作成
- メッセージオブジェクトに、キャラ名とイラストIDを追加、ボイス欄も。
- MessageWindowクラス側で、キャラ名表示とイラスト表示のメソッド追加
- デモを見ながら調整する
まずはNPCクラスを元に、各キャラクターのセリフやイラストを拡張できるようにしたいと思います。
NPCクラスの元を作る
class NPC extends SpriteActor { //NPCのベースとなるクラス
    constructor(x, y, sprite, hitArea, tags) {
        super(x, y, sprite, hitArea, tags);
        this.Rad_To_8 = 4/Math.PI; //ラジアン表記の角度を±4の8段階で
        this.talkNumber = 0; //会話イベント時の会話内容を切り替えるID
        this.addEventListener('hit', (e) => {
            if(e.target.hasTag('playerAction')) {
                const vect = new Vector2D(e.target.player.hitArea.cx - this.hitArea.cx, e.target.player.hitArea.cy - this.hitArea.cy); //正の値ならプレイヤー右向
                this.dir = Math.atan2(-vect.dy,vect.dx); //2Dベクトルから角度に変換する式で、NPCの向きを変更
                e.target.player.dir = this.dir + Math.PI; //プレイヤーはNPCと反対方向を向く
                e.target.release(); //アクション範囲をシーンから消す(複数イベントが重なるのを防ぐため)
                this.talkStart(this.talkNumber); //会話を発生させる関数を起動
            }
        });
    }

    talkStart(value) {//会話を表示する関数サンプル、NPCの拡張クラスではこの関数を上書きすることで各キャラクター固有の会話内容を設定できます。
        let messages;
        switch (value) {
            case 0 : messages = ['こんにちは。']; break;
            case 1 : messages = ['ふいーーーーーー', 'やれやれ']; break;
            default: messages = ['さて…']; this.talkNumber=-1; break;
        }
        const messageWindow = new MessageWindow(messages);
        this.dispatchEvent('openWindow',  new Event(messageWindow));
        this.talkNumber++;
    }

    get dir() { return this._dir; }
    set dir(value) { this._dir = value; //プレイヤーの向きが変わった時、画像も差し替え
        const delta = (value * this.Rad_To_8) % 8; //ラジアン角度から±4の8段階で向きをチェック
        if (-1 <= delta && delta <= 1 || 7 <= delta ) { this.sprite.y = this.sprite.height*2; return; } //画像右向き
        else if (1 < delta && delta < 3 || -7 < delta && delta < -5) { this.sprite.y = this.sprite.height*3; return; } //画像上向き
        else if (3 <= delta && delta <= 5 || -5 <= delta && delta <= -3) { this.sprite.y = this.sprite.height; return; } //画像左向き
        else if (-3 < delta && delta < -1 || 5 < delta && delta < 7 ) { this.sprite.y = 0; return; } //画像下向き
    }
    get walkCount() { return this._walkCount; }
    set walkCount(value) { this._walkCount = value; //歩行カウントが一定以上に達した時、歩くモーション画像を変化
        if(this._walkCount % 128 > 96) { this.sprite.x = 0; }
        else if(this._walkCount % 128 > 64) { this.sprite.x = this.sprite.width; }
        else if(this._walkCount % 128 > 32) { this.sprite.x = this.sprite.width*2; }
        else if(this._walkCount % 128 > 0) { this.sprite.x = this.sprite.width; }
    }  //歩行距離に合わせて、sprite画像の歩行モーションを変える
    get isStand() { return this._isStand; } //立ち止まった時に直立姿勢にする関数をsetに代入
    set isStand(boolean) { this._isStand = boolean; if(boolean) {this.sprite.x = this.sprite.width;} }
}
NPCから拡張するNPC_girl1クラスを設定する
そしてNPCの元から拡張するクラスで、各キャラクター固有の動作を組み込むことが出来ます。 新しく拡張したNPC_girl1(仮)を表すクラスで、どんなセリフを喋らせるかをtalkStart()で上書きします。class NPC_girl1 extends NPC {
constructor(x, y, name) {
const sprite = new Sprite(assets.get('npc1'), 32, 0, 32, 32);
const hitArea = new Rectangle(6, 4, 20, 28); //Circle(16, 16, 16);
super(x, y, sprite, hitArea, ['npc']);
this.name = name;
this.illust = {i1:null};
}
talkStart(talkNumber) { //会話を表示する関数、NPCの拡張クラスではこの関数を上書きして各々の会話内容を設定します。
let messages;
switch (talkNumber) {
case 0 : messages = ['こんにちは。あのーなにしてるんですか? どなたさまですか?','わたしは#rおねむ#bよ、#rねむねむ#bよ。まっくらすやぁってぐっすりねるの。', 'ひつじがいっぴきー、ひつじがにひきー。ひつじがさんびきー、ひつじがよnZ#<Z#<Z#<Z#<ZZ…', '#<#<#<#<#<※これは#=会話テスト!#.#.']; break;
case 1 : messages = ['ふいーーーーーー、よく#^ネ#v#vた#^わ。#nすっきりお目ざめかしら。','すてきなミカンがいっぱいふってくる夢をみたわ。たべほうだい。#nふゆはこたつでぐー0…', '※これは会話テストです#.#.']; break;
case 2 : messages = ['この世界のこと、誰かが決まり文句のように言うの。', 'ようこそ始まりの空間へ。「Hettom fWorld」と aaaaaaaaaaaaaaaaaaaaaあああああああああああああああああああああああああああああああああああああああああああああああああああああああああああああああああああああああああああ…', '※これは会話テストです#.#.']; break;
default: messages = ['さて...#.#.#.']; this.talkNumber=-1; break;
}
const messageWindow = new MessageWindow(messages);
this.dispatchEvent('openWindow', new Event(messageWindow));
this.talkNumber++;
}
}
ここから、メッセージの描き方を少し修正する必要があります、メッセージ内容と合わせて名前とイラスト、あとボイス?も組み込むのを見越して、拡張してみます。
MessageWindowへ渡す必要情報をオブジェクトにまとめる
class Message {
    constructor(name, text, illust, voice) {
        this.name = name;
        this.text = text;
        this.illust = illust;
        this.voice = voice;
    }
}
従来までは、["テキスト","テキスト","テキスト","テキスト"]という形で渡していたメッセージ内容を、
このクラスを使って、[new Message(), new Message(), new Message(), new Message()]という配列に置き換えます。
するとテキスト内容に加え、その時点でのセリフを喋ってる人物の名前、立ち絵、ボイスをそれぞれ渡せる形になります。 例えば一つのnew Message()の中には、{name:"女の子", text:['こんにちは', 'あのーどちらさまですか?'], illust:null, voice:null};という項目が入り、後に続くnew Message()の数だけ各要素が切り替えできるようになります。
拡張したNPC_girl1クラスでは以下のように描けます。
NPC_girl1クラスでのメッセージイベント記述
class NPC_girl1 extends NPC {
    constructor(x, y, name) {
        const sprite = new Sprite(assets.get('npc1'), 32, 0, 32, 32);
        const hitArea = new Rectangle(6, 4, 20, 28); //Circle(16, 16, 16);
        super(x, y, sprite, hitArea, ['npc']);
        this.name = name;
        this.illust = [];
        this.illust.push(new Sprite(assets.get('up_npc_girl1'), 0, 0, 200, 400)); //0
    }
    talkStart(talkNumber) { //会話を表示する関数、NPCの拡張クラスではこの関数を上書きして各々の会話内容を設定します。
        let messages;
        switch (talkNumber) {
            default : messages = [
 new Message(this.name, ['こんにちは。あのーなにしてるんですか? どなたさまですか?', 'わたしは#rおねむ#bよ、#rねむねむ#bよ。まっくらすやぁってぐっすりねるの。']),
 new Message(this.name, ['ひつじがいっぴきー、ひつじがにひきー。ひつじがさんびきー、ひつじがよnZ#<Z#<Z#<Z#<ZZ…',], this.illust[0]),
 new Message("", ['#<#<#<#<#<※これは#=会話テスト!#.#.'])
]; break;
        }
        const messageWindow = new MessageWindow(messages);
        this.dispatchEvent('openWindow',  new Event(messageWindow));
        this.talkNumber++;
    }
}
MessageWindowクラスの修正
前回までthis.currentMessageにテキストのみ読み込んでましたが、今回はこの部分をNPC側から受け取るMessageクラスのオブジェクトに差し替え。 そしてテキストデータを参照するときにthis.currentMessageTextを定義し、this.currentMessage.textの配列0番目から文字列を読み込むようにします。エディタ上で「this.currentMessage」の文字列を検索して、順に修正を加えてあげるとやりやすいかもです。
MessageWindowクラスの修正
class MessageWindow extends WindowUI {//メッセージウィンドウの管理と会話送り
    constructor(allMessages) {
        super(['messageWindow']);
        this.color = "#555"; //テキスト色の初期値
        this.size = 15; //テキストサイズの初期値
        this.fontStyle = "sans-serif"
        this.lineHeight = this.size * 1.5; //段落の高さ。フォントサイズに対する高さ比で算出
        this.textMaxWidth = 472; //テキストの最大表示幅

        this.margin = 2; //画面端からウィンドウ描画の間隔をどれくらいあけるか?
        this.windowWidth = screenCanvasWidth - this.margin*2; //現在508 ウィンドウ枠の幅をどれくらいとるか
        this.windowHeight = 100; //ウィンドウ枠の高さをどれくらいとるか
        this.windowX = this.margin; //左画面端から余白(=margin)がウィンドウ描画位置のX座標にもなる
        this.windowY = screenCanvasHeight - this.windowHeight - this.margin; //ウィンドウ描画位置のY座標

        this._timeCount = 0; //次の表示までの経過フレーム数。会話のテンポをとるのに使用。0より大きい値ならアップデート毎に-1し、0になるまでテキストを更新しない。
        this.allMessages = allMessages; //全てのメッセージオブジェクトが格納された配列
        this.currentMessage = this.allMessages.shift(); //今表示するべきメッセージオブジェクト、全メッセージリストの先頭を取り出した値

        //会話終了時にウィンドウを破棄&プレイヤー操作再開
        this.addEventListener('textEnd', () => { this.close(); this.playerIsActive(); });
    }

    get currentMessage() { return this._currentMessage; }
    set currentMessage(message) { //会話フェーズの移行と、各要素の初期化
        if(message === undefined) { // もう空っぽだったらtextEndイベントを発生させる
            this._currentMessageText = ''; // undefinedのままだと一瞬undefinedが描画されるかもしれないので…
            this.dispatchEvent('textEnd'); return;// textEndイベントを発行
        }
        this._currentMessage = message; //↓現在の会話内容が更新される際、一旦表示要素をリセットする。
        this.currentMessageText = this._currentMessage.text.shift(); //テキストの配列から、現在ウィンドウに表示する会話フェーズを取り出す
    }
    get currentMessageText() { return this._currentMessageText; }
    set currentMessageText(str) { //会話フェーズ内のテキスト内容の移行と初期化
        if(str === undefined) {
            this.currentMessage = this.allMessages.shift(); return;// 次のテキストが見つからない場合、次の会話フェーズに移行する
        }
        this._currentMessageText = str;
        this.textNumber = 0; //今表示するのはcurrentMessageTextの何番目の文字?
        this.line = 0; //現在のテキスト文字は、ウィンドウの何段目に表示する?
        this.nowTextWidth = 0; //現在表示されてるテキスト幅を測るのに使用
        this.heightPlus = 0; //テキスト表示位置の高さの微調整に使用
        this.heightPlusArray = null; //その段落の高さ調整分の値を配列に記録。初期値null
        this.size = 15; //フォントサイズも初期化
        this.rubySize=9; //ふりがなのフォントサイズ
        this.rubyX = null; //ふりがなを宛てる漢字は何文字?というのを保持するための要素,,,ふりがな描画するモードかどうかの判定も兼ねる
        this.ruby = 0; //ふりがなのひらがなの文字数をカウント。
        this.inited = false; //ウィンドウ枠の初期化が必要ならfalse
    }

    messageSizeCheck(context) { //ここから、段落ごとの最大フォントサイズをチェック
        const checkNum1 = this.currentMessageText.indexOf("#<"); //フォントを大きくする特殊文字が含まれないなら-1が代入される
        if(checkNum1 === -1) {return;} // フォントを大きくする記述がないならそのままでOK
        else { /*#<文字列が含まれるなら最大フォントサイズチェック!*/
            let count = 0;
            let maxSize = 15;
            let nowSize = 15;
            let textWidth = 0;
            let heightPlus = 0;
            this.heightPlusArray = []; //この値を求めるための↓長ったらしい関数。その段落の高さ調整分をthis.heightPlus[this.line]で取り出せる形にするのに、こんな行数かかってしまうとは。。しかし表示を綺麗にするにはしゃーないのか。文字サイズ弄らなければ無駄に動くこともないし、いいか...(' '*)
            while(count < this.currentMessageText.length) {
                const char = this.currentMessageText.charAt(count);
                let char2;
                if(char === "#") { count++; //取り出した文字が#の場合、次の一文字を調べる。関数が登録されてる文字列の場合無視
                    char2 = this.currentMessageText.charAt(count);
                    if(char2 === "n") {
                        heightPlus += maxSize - 15;
                        this.heightPlusArray.push(heightPlus); checkWidth = 0; maxSize = nowSize;
                    }
                    else if(char2 === "<") { nowSize += 3; if(nowSize > maxSize) {maxSize=nowSize;} }
                    else if(char2 === ">") { nowSize -= 3; }
                }
                if(char !== "#" || char2 === "#") { //ここで取り出した1文字が#でない場合と、##で続いた場合の#を拾える
                    context.font = `${nowSize}px ${this.fontStyle}`;
                    const charWidth = context.measureText(char).width;
                    const nextCheckWidth = textWidth + charWidth;
                    if( nextCheckWidth > this.textMaxWidth ) {  //表示するテキスト幅がtextMaxWidthを超えるとき、判定1行終わり、高さ調整の判定値を配列に追加。
                        heightPlus += maxSize - 15;
                        this.heightPlusArray.push(heightPlus); textWidth = 0; maxSize = nowSize;
                    }
                    textWidth += charWidth;
                }
                count++;
            }
            heightPlus += maxSize - 15;
            this.heightPlusArray.push(heightPlus);  //全ての文字を表示した後の、最後の段落判定
        }
    }


    clearRendering(target) { //___描画領域をクリアする
        const context = target.getContext('2d');
        const width = this.windowWidth + this.margin*2;
        const height = this.windowHeight + this.margin*2;
        context.clearRect(0, this.windowY - this.margin, width, height);
    }
    renderingMessageBoard(context) { //最初にメッセージボードを描画する
        context.fillStyle = 'rgba(255,255,255,0.99)'; //塗りつぶす色は白';
        context.strokeStyle = 'rgba(125,125,255,0.99)'; //枠は青っぽい
        context.fillRect(this.windowX, this.windowY, this.windowWidth, this.windowHeight);
        context.strokeRect(this.windowX, this.windowY, this.windowWidth, this.windowHeight);
    }
    renderText(context, char) { //ここからテキスト描画メソッド
        const nextTextWidth = this.nowTextWidth + context.measureText(char).width; //テキスト幅を更新した後の値を先読み
        if( nextTextWidth > this.textMaxWidth ) {  //表示するテキスト幅がtextMaxWidthを超えるとき、自動的に改行する。
            this.line++; this.nowTextWidth = 0; //段落を変更したら、これまでのテキスト幅は0に。
        }

        context.font = `${this.size}px ${this.fontStyle}`;
        context.fillStyle = `${this.color}`;
        if(this.nowTextWidth === 0 && this.heightPlusArray) { this.heightPlus += this.heightPlusArray[this.line]; } //段落最初に判定、この行の最大文字サイズで、表示位置の高さを調整
        //1文字毎にテキストを描画
        const textX = this.windowX + 20 + this.nowTextWidth; //テキスト描画位置のX座標 =「枠の左端から20離す」に、これまでのテキスト幅をカウント
        const textY = this.windowY + 30 + this.lineHeight * this.line + this.heightPlus; // Y座標 =「枠の上端から30開ける」に、現在の段落*段落分の高さをカウント
        context.fillText(char, textX, textY); //テキスト描画の関数本体
        this.nowTextWidth += context.measureText(char).width; //表示テキスト幅に現在の文字の幅分を追加
    }
    renderRuby(context, char) { //ふりがなを描画するメソッド
        context.font = `${this.rubySize}px ${this.fontStyle}`;
        context.fillStyle = `${this.color}`;
        const rubyHiraganaWidth = this.rubySize * this.ruby; //ふりがなの描画の幅(描画位置の調整に必要な値)
        const rubyTextWidth = this.rubyX * this.size; //ふりがな宛先のテキスト幅(描画位置の調整に必要な値2)
        const rubyRelativeX = (rubyTextWidth - rubyHiraganaWidth) * 0.5 - rubyTextWidth; //ルビ描画位置のX軸方向の調整値を計算
        const textX = this.windowX + 20 + this.nowTextWidth + rubyRelativeX; //テキスト描画位置のX座標 =「枠の左端から20離す」に、これまでのテキスト幅をカウントし、調整幅分だけ左にずらす
        const textY = this.windowY + 30 + this.lineHeight * this.line + this.heightPlus - this.size + 1; // Y座標 =「枠の上端から30開ける」に、現在の段落*段落分の高さをカウント
        context.fillText(char, textX, textY ); //テキスト描画の関数本体、ふりがな用に描画位置を調整している
    }


    updateText(context) { //表示テキストを1文字ずつ追加するメソッド
        if(!this.rubyX) { //ふりがな描画モードでないなら、通常の文字の処理
          const char = this.currentMessageText.charAt(this.textNumber); //このアップデートで表示するべき1文字を取り出す
          const frameSkip24 = ["。", "?", "…"]; //この後に表示間隔を24フレーム開ける文字列を定義(0.4秒)
          const frameSkip12 = ["、"]; //この後に表示間隔を12フレーム開ける文字列を定義(0.2秒)
          if( frameSkip24.indexOf(char) > -1 ) {this._timeCount = 24;} //現在の文字が、その文字列のいずれかと一致した場合24フレーム開ける
          else if( frameSkip12.indexOf(char) > -1 ) {this._timeCount = 12;}

          if(char === "#") { this.textNumber++; //取り出した文字が#の場合、次の一文字を調べる。#の直後に特定の文字列だった場合に、対応する関数を記述
            const char2 = this.currentMessageText.charAt(this.textNumber);
            if(char2 === "n") { this.line++; this.nowTextWidth = 0; } //"#n"で、自動的に改行する。段落を変更したら、これまでのテキスト幅は0に。
            else if(char2 === "<") { this.size += 3; this.rubySize += 1; } /* "#<"でフォントサイズを3大きく、ふりがなを1大きくする*/
            else if(char2 === ">") { this.size -= 3; this.rubySize -= 1; } // "#>"でフォントサイズを3小さく、ふりがなを1小さくする
            else if(char2 === "=") { this.size = 15; this.rubySize = 6; } // "#="でフォントサイズを元の大きさにする
            else if(char2 === "^") { this.heightPlus -= 3; } // "#^"でフォント位置を上に3ずらす
            else if(char2 === "v") { this.heightPlus += 3; } // "#v"でフォント位置を下に3ずらす
            else if(char2 === "r") { this.color = "#c64";} //"#r"でフォント色を赤に
            else if(char2 === "b") { this.color = "#555";} //"#b"でフォント色を元の黒いグレーに戻す
            else if(char2 === ".") { this._timeCount = 12; } //"#."で次の文字の表示ラグを12フレーム(1/5秒)開ける
            else if(char2 === "[") { this.textNumber++; //ふりがなを宛てる開始位置(ふりがなモードON) 例:振仮名#[3,ふりがな]という記述を想定している
                const char3 = this.currentMessageText.charAt(this.textNumber); //[の次は、ふりがな宛て先の「漢字文字数」が指定されている。この要素は数字。!isNaN(char)
                this.rubyX = char3; this.textNumber++; //以後、今回のふりがなモードではthis.rubyXが漢字(宛先)の文字数を表す
            }
            else if(char2 === "#") {this.renderText(context, char2);} //##で続く場合、2文字目の#を普通に描画する
          }
          else {this.renderText(context, char);} //#でないなら、取り出した1文字を普通に描画する
          this.textNumber++; //描画処理が終わったら、表示テキスト番号を次のカウントに振る
       }
       else if(this.rubyX) {//ふりがな描画モードなら、ふりがな専用の処理を適用
       let rubyStr = ""; //rubyStrという要素に、先の"ふりがな"文字列を格納する
         for(let count = 0; count < 31; count++) { //さすがに31文字以上の「ふりがな」は無いだろう。"]"で処理を終了するし
           const char = this.currentMessageText.charAt(this.textNumber);
           this.textNumber++;
           if(char === "]") {break;} //"]"でふりがなモードを終了。それ以外ならふりがな一文字を追加して次のふりがなへ
           rubyStr += char; this.ruby++;
           }
         this.renderRuby(context, rubyStr); //ふりがなを描画するメソッド
         this.rubyX = false; this.ruby = 0; //描き終わった後の、ふりがなモードを終了(リセット)するための記述
       }
    }
    update(gameInfo, input, touch, target) { //毎フレーム呼び出されるupdateメソッド。このクラスのプログラム動作の本体
        this.playerIsStay(); //メッセージウィンドウが存在する限り、プレイヤー操作を止める
        const context = target.getContext('2d');
        if(!this.inited){
            this.renderingMessageBoard(context);
            this.messageSizeCheck(context);
            this.inited = true;
        return;} //メッセージが切り替わる際に、会話ウィンドウを初期化してメッセージ表示の調整チェック

        if( this.currentMessageText.length < this.textNumber) { //現在の会話の文字数すべて表示されてるなら
            if(input.getKey(' ') || touch.touch) {  //スペースキーorタッチを押した時に
                this.currentMessageText = this._currentMessage.text.shift(); // 次のメッセージに移行
            }
        }
        else if( this._timeCount === 0 ) {
            this.updateText(context);
            if( (input.getKey(' ') || touch.touch) && this.textNumber > 3) { let count = 0; //スペースキーorタッチで一度に最大10文字まで更新、会話更新のボタンと被るので、最初の3文字まではスキップしない。
                while( count < 5 && (input.getKey(' ') || touch.touch) && this._timeCount == 0 && this.currentMessageText.length >= this.textNumber) {
                    this.updateText(context); count++;
                }
                if(this._timeCount > 0) { this._timeCount >> 1; } //スペースキーが押されてるなら、タイムラグを半分の時間(端数切り捨て)に
            }
        }
        else if(this._timeCount > 0) {this._timeCount--;}
    }
}
修正のポイントは、大枠となるthis.currentMessageと、テキスト部分のcurrentMessageTextの扱いでしょうか。
⇒ テキスト表示のデモ(スペースキーでアクション)
大枠のcurrentMessageと、その内のcurrentMessageTextの設定
    get currentMessage() { return this._currentMessage; }
    set currentMessage(message) { //会話フェーズの移行と、各要素の初期化
        if(message === undefined) { // もう空っぽだったらtextEndイベントを発生させる
            this._currentMessageText = ''; // undefinedのままだと一瞬undefinedが描画されるかもしれないので…
            this.dispatchEvent('textEnd'); return;// textEndイベントを発行
        }
        this._currentMessage = message; //↓現在の会話内容が更新される際、一旦表示要素をリセットする。
        this.currentMessageText = this._currentMessage.text.shift(); //テキストの配列から、現在ウィンドウに表示する会話フェーズを取り出す
    }
    get currentMessageText() { return this._currentMessageText; }
    set currentMessageText(str) { //会話フェーズ内のテキスト内容の移行と初期化
        if(str === undefined) {
            this.currentMessage = this.allMessages.shift(); return;// 次のテキストが見つからない場合、次の会話フェーズに移行する
        }
        this._currentMessageText = str;
        this.textNumber = 0; //今表示するのはcurrentMessageTextの何番目の文字?
        this.line = 0; //現在のテキスト文字は、ウィンドウの何段目に表示する?
        this.nowTextWidth = 0; //現在表示されてるテキスト幅を測るのに使用
        this.heightPlus = 0; //テキスト表示位置の高さの微調整に使用
        this.heightPlusArray = null; //その段落の高さ調整分の値を配列に記録。初期値null
        this.size = 15; //フォントサイズも初期化
        this.rubySize=9; //ふりがなのフォントサイズ
        this.rubyX = null; //ふりがなを宛てる漢字は何文字?というのを保持するための要素,,,ふりがな描画するモードかどうかの判定も兼ねる
        this.ruby = 0; //ふりがなのひらがなの文字数をカウント。
        this.inited = false; //ウィンドウ枠の初期化が必要ならfalse
    }
大きい羽車(総合情報)と小さい歯車(その内のテキスト)の関係で、小さい歯車を切り替えて最後まで行ったら大きい羽車が1つ動くような感じです。
スペースキーやタッチではcurrentMessageTextを切り替えます
    update(gameInfo, input, touch, target) { //毎フレーム呼び出されるupdateメソッド。このクラスのプログラム動作の本体
        this.playerIsStay(); //メッセージウィンドウが存在する限り、プレイヤー操作を止める
        const context = target.getContext('2d');
        if(!this.inited){ //会話フェーズが切り替わるならウィンドウ枠全体の初期化
            this.clearRendering(target);
            this.renderingMessageBoard(context);
            this.renderingName(context);
            this.messageSizeCheck(context);
            this.inited = true;
            this.initedText = true;
            return;
        }
        if(!this.initedText){ //メッセージが切り替わるなら、テキスト表示を初期化してテキストサイズの調整チェック
            this.renderingBoardClear(context);
            this.messageSizeCheck(context);
            this.initedText = true;
            return;
        }
        if( this.currentMessageText.length < this.textNumber) { //現在の会話の文字数すべて表示されてるなら
            if(input.getKey(' ') || touch.touch) {  //スペースキーorタッチを押した時に
                this.currentMessageText = this._currentMessage.text.shift(); // 次のメッセージに移行
            }
        }

//~~
問題なく動くのを確認してから、名前表示のステップに移ります。
セリフを喋る人物名を表示
この設計でmessageオブジェクトを受け取ったら、そこから.nameにアクセスしてキャラクター名を取得できるようになってます。 nameの文字列の長さを受け取って、名前表示用のウィンドウと一緒に描画すればいい感じです。たぶん。ともあれやってみます。
名前表示用のウィンドウを追加
    renderingName(context) { //会話の最初に名前を描画する関数
        context.font = `${this.size}px ${this.fontStyle}`;
        const nameWidth = context.measureText(this.currentMessage.name).width; //名前表示の文字列の長さを取得
        if(!nameWidth) {return;} //名前がないなら表示しない

        const width = nameWidth + this.paddingLeft*2;
        const height = this.nameHeight + this.margin; //this.nameHeightは、constructor内にて30に設定
        context.fillStyle = 'rgba(255,255,255,1.0)'; //塗りつぶす色は白
        context.strokeStyle = 'rgba(125,125,255,0.99)'; //枠は青っぽい
        context.fillRect(this.windowX, this.windowY - this.nameHeight, width, height);
        context.strokeRect(this.windowX, this.windowY - this.nameHeight, width, height - this.margin);
        context.fillRect(this.windowX+1, this.windowY -1, width - 2, 2); //白枠の延長

        context.fillStyle = "#063";
        const textX = this.windowX + this.paddingLeft; //テキスト描画位置のX座標 =「枠の左端から20」をカウント
        const textY = this.windowY - 5; // Y座標 =「枠の上端から5上にカウント
        context.fillText(this.currentMessage.name, textX, textY); //テキスト描画の関数本体
    }
細かいデザインの調整などは、各自好きなように。
描画領域クリアメソッドの修正
    clearRendering(target) { //___描画領域をクリアする
        const context = target.getContext('2d');
        const Y = this.windowY - this.nameHeight - this.margin;
        const width = this.windowWidth + this.margin*2;
        const height = this.windowHeight + this.margin*2 + this.nameHeight;
        context.clearRect(0, Y, width, height); //名前表示&テキストスペースクリア
    }
シーンにアクターを追加する際に名前も設定
class MainScene extends Scene {
    constructor(actorsCanvas, windowsUICanvas) {
        super('メイン', 800, 600, 'bg0', actorsCanvas, windowsUICanvas);

        this.add(global.player);

        const Curve2 = new BezierCurveActor (30, 30,  30, 340,  300, 240, 40, 360);
        this.add(Curve2);
        const Curve1 = new BezierCurveActor (400, 110,  70, 20, 220, 160, 330, 180);
        this.add(Curve1);

        const npc1 = new NPC_girl1(150, 100,'すみれ秘書'); //ここで名前も設定
        this.add(npc1);
    }
}
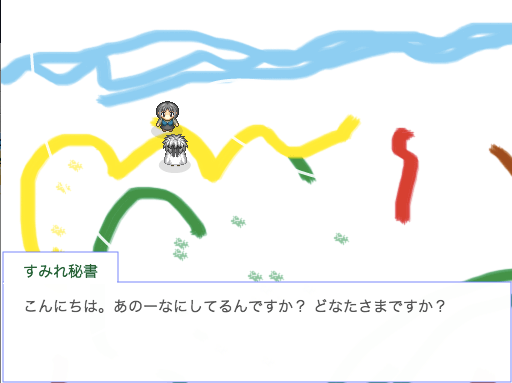
⇒ 会話中の名前表示のデモ(スペースキーでアクション)
無事に名前が表示されました。
キャラクター立ち絵を表示する
名前を表示することができれば、キャラクター絵の表示も簡単でした。アセットに画像ファイルを追加
assets.addImage('player', 'images/chara_player.png');
assets.addImage('npc1', 'images/chara_npc1.png');
assets.addImage('bg0', 'images/backimage0.png');
assets.addImage('up_npc_girl0', 'images/up_npc_girl0.png'); //ここを追加
assets.addImage('up_npc_girl1', 'images/up_npc_girl1.png'); //ここを追加
assets.loadAll().then((a) => {
    const game = new RolePlayingGame();
    document.body.appendChild(game.actorsCanvas);
    document.body.appendChild(game.windowsUICanvas);
    document.body.appendChild(timeCounter);
    game.start();

    global.player = new Player(150, 200, 90); //globalオブジェクトに、player: new Player();のプロパティを追加。global.playerでアクセス可能に!
});
アクター側に画像ファイル情報を持たせておく
class NPC_girl1 extends NPC {
    constructor(x, y, name) {
        const sprite = new Sprite(assets.get('npc1'), 32, 0, 32, 32);
        const hitArea = new Rectangle(6, 4, 20, 28); //Circle(16, 16, 16);
        super(x, y, sprite, hitArea, ['npc']);
        this.name = name;
        this.illust = [];
        this.illust[0]=new Sprite(assets.get('up_npc_girl0'), 0, 0, 200, 400); //通常
        this.illust[1]=new Sprite(assets.get('up_npc_girl1'), 0, 0, 200, 400); //ねむねむ
    }
    talkStart(talkNumber) { //会話を表示する関数、NPCの拡張クラスではこの関数を上書きして各々の会話内容を設定します。
        let messages;
        switch (talkNumber) {
            default : messages = [
 new Message(this.name, ['こんにちは。あのーなにしてるんですか? どなたさまですか?', 'わたしは#rおねむ#bよ、#rねむねむ#bよ。まっくらすやぁってぐっすりねるの。'], this.illust[0]),
 new Message(this.name, ['ひつじがいっぴきー、ひつじがにひきー。ひつじがさんびきー、ひつじがよnZ#<Z#<Z#<Z#<ZZ…',], this.illust[1]),
 new Message("", ['#<#<#<#<#<※これは#=会話テスト!#.#.'])
]; break;
        }
        const messageWindow = new MessageWindow(messages);
        this.dispatchEvent('openWindow',  new Event(messageWindow));
        this.talkNumber++;
    }
}
MessageWindow内にて、キャラ絵を描画するメソッドを用意
    renderingCharactor(context) { //立ち絵表示
        const sprite = this._currentMessage.illust;
        if(sprite === undefined) {this.textMaxWidth = 472; return;} //立ち絵がない時はテキスト表示の最大幅を広げる
        this.textMaxWidth = 332; //テキスト表示の最大幅を調整
        context.drawImage(sprite.image, //ここからsprite画像の描画
            sprite.x, sprite.y,
            sprite.width, sprite.height,
            screenCanvasWidth - sprite.width, 0, // アクターの描画位置を、スクローラーの座標分ずらして調整
            sprite.width, sprite.height); //sprite画像ここまで
    }
update内に追記
    update(gameInfo, input, touch, target) { //毎フレーム呼び出されるupdateメソッド。このクラスのプログラム動作の本体
        this.playerIsStay(); //メッセージウィンドウが存在する限り、プレイヤー操作を止める
        const context = target.getContext('2d');
        if(!this.inited){ //会話フェーズが切り替わるならウィンドウ枠全体の初期化
            this.clearRendering(target);
            this.renderingMessageBoard(context);
            this.renderingName(context);
            this.renderingCharactor(context); //ここを追加
            this.messageSizeCheck(context);
            this.inited = true;
            this.initedText = true;
            return;
        }
        if(!this.initedText){ //メッセージが切り替わるなら、テキスト表示を初期化してテキストサイズの調整チェック
            this.renderingBoardClear(context);
            this.renderingCharactor(context); //此処を追加
            this.messageSizeCheck(context);
            this.initedText = true;
            return;
        }
//〜〜省略
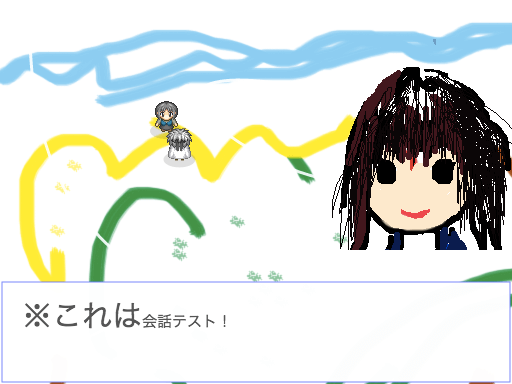
⇒ 会話中の立ち絵表示のデモ(スペースキーでアクション)
おっといけない!
描画全体をクリアするメソッドに立ち絵領域が入ってなかった... これじゃホラーだ。。
描画全体をクリアするメソッドも忘れず修正!
    clearRendering(target) { //___描画領域をクリアする
        const context = target.getContext('2d');
        const Y = this.windowY - this.nameHeight - this.margin;
        const width = this.windowWidth + this.margin*2;
        const height = this.windowHeight + this.margin*2 + this.nameHeight;
        context.clearRect(0, Y, width, height);  //名前表示&テキストスペースクリア
        context.clearRect(screenCanvasWidth - 200, 26, 200, 360); //キャラクター立ち絵領域をクリア
    }
⇒ 会話中の立ち絵表示のデモOK(スペースキーでアクション)
これでいーでしょ。うん、いい感じですね。
フェードインとかいう効果は、現状の描画の仕方だと厳しい。ちょっと工夫する必要がありそうですね。
まぁいいです。会話システムの大枠が無事完成です!
現段階の完成形のMessageWindowクラス
class MessageWindow extends WindowUI {//メッセージウィンドウの管理と会話送り
    constructor(allMessages) {
        super(['messageWindow']);
        this.color = "#555"; //テキスト色の初期値
        this.size = 15; //テキストサイズの初期値
        this.fontStyle = "sans-serif"
        this.lineHeight = this.size * 1.5; //段落の高さ。フォントサイズに対する高さ比で算出
        this.textMaxWidth = 332; //テキストの最大表示幅、キャラ立ち絵表示のとき332、立ち絵なしのとき472

        this.margin = 2; //画面端からウィンドウ描画の間隔をどれくらいあけるか?
        this.paddingLeft = 20; //画面左からテキストをどれくらい開けるか?
        this.nameHeight = 30; //名前表示用のウィンドウ高さ
        this.windowWidth = screenCanvasWidth - this.margin*2; //現在508 ウィンドウ枠の幅をどれくらいとるか
        this.windowHeight = 100; //ウィンドウ枠の高さをどれくらいとるか
        this.windowX = this.margin; //左画面端から余白(=margin)がウィンドウ描画位置のX座標にもなる
        this.windowY = screenCanvasHeight - this.windowHeight - this.margin; //ウィンドウ描画位置のY座標

        this._timeCount = 0; //次の表示までの経過フレーム数。会話のテンポをとるのに使用。0より大きい値ならアップデート毎に-1し、0になるまでテキストを更新しない。
        this.allMessages = allMessages; //全てのメッセージオブジェクトが格納された配列
        this.currentMessage = this.allMessages.shift(); //今表示するべきメッセージオブジェクト、全メッセージリストの先頭を取り出した値

        //会話終了時にウィンドウを破棄&プレイヤー操作再開
        this.addEventListener('textEnd', () => { this.close(); this.playerIsActive(); });
    }

    get currentMessage() { return this._currentMessage; }
    set currentMessage(message) { //会話フェーズの移行と、各要素の初期化
        if(message === undefined) { // もう空っぽだったらtextEndイベントを発生させる
            this._currentMessageText = ''; // undefinedのままだと一瞬undefinedが描画されるかもしれないので…
            this.dispatchEvent('textEnd'); return;// textEndイベントを発行
        }
        this._currentMessage = message; //↓現在の会話内容が更新される際、一旦表示要素をリセットする。
        this.currentMessageText = this._currentMessage.text.shift(); //テキストの配列から、現在ウィンドウに表示する会話フェーズを取り出す
        this.inited = false; //ウィンドウ枠の初期化が必要ならfalse
    }
    get currentMessageText() { return this._currentMessageText; }
    set currentMessageText(str) { //会話フェーズ内のテキスト内容の移行と初期化
        if(str === undefined) {
            this.currentMessage = this.allMessages.shift(); return;// 次のテキストが見つからない場合、次の会話フェーズに移行する
        }
        this._currentMessageText = str;
        this.textNumber = 0; //今表示するのはcurrentMessageTextの何番目の文字?
        this.line = 0; //現在のテキスト文字は、ウィンドウの何段目に表示する?
        this.nowTextWidth = 0; //現在表示されてるテキスト幅を測るのに使用
        this.heightPlus = 0; //テキスト表示位置の高さの微調整に使用
        this.heightPlusArray = null; //その段落の高さ調整分の値を配列に記録。初期値null
        this.size = 15; //フォントサイズも初期化
        this.rubySize=9; //ふりがなのフォントサイズ
        this.rubyX = null; //ふりがなを宛てる漢字は何文字?というのを保持するための要素,,,ふりがな描画するモードかどうかの判定も兼ねる
        this.ruby = 0; //ふりがなのひらがなの文字数をカウント
        this.initedText = false; //テキスト表示の初期化が必要ならfalse
    }

    messageSizeCheck(context) { //ここから、段落ごとの最大フォントサイズをチェック
        const checkNum1 = this.currentMessageText.indexOf("#<"); //フォントを大きくする特殊文字が含まれないなら-1が代入される
        if(checkNum1 === -1) {return;} // フォントを大きくする記述がないならそのままでOK
        else { /*#<文字列が含まれるなら最大フォントサイズチェック!*/
            let count = 0;
            let maxSize = 15;
            let nowSize = 15;
            let textWidth = 0;
            let heightPlus = 0;
            this.heightPlusArray = []; //この値を求めるための↓長ったらしい関数。その段落の高さ調整分をthis.heightPlus[this.line]で取り出せる形にするのに、こんな行数かかってしまうとは。。しかし表示を綺麗にするにはしゃーないのか。文字サイズ弄らなければ無駄に動くこともないし、いいか...(' '*)
            while(count < this.currentMessageText.length) {
                const char = this.currentMessageText.charAt(count);
                let char2;
                if(char === "#") { count++; //取り出した文字が#の場合、次の一文字を調べる。関数が登録されてる文字列の場合無視
                    char2 = this.currentMessageText.charAt(count);
                    if(char2 === "n") {
                        heightPlus += maxSize - 15;
                        this.heightPlusArray.push(heightPlus); checkWidth = 0; maxSize = nowSize;
                    }
                    else if(char2 === "<") { nowSize += 3; if(nowSize > maxSize) {maxSize=nowSize;} }
                    else if(char2 === ">") { nowSize -= 3; }
                }
                if(char !== "#" || char2 === "#") { //ここで取り出した1文字が#でない場合と、##で続いた場合の#を拾える
                    context.font = `${nowSize}px ${this.fontStyle}`;
                    const charWidth = context.measureText(char).width;
                    const nextCheckWidth = textWidth + charWidth;
                    if( nextCheckWidth > this.textMaxWidth ) {  //表示するテキスト幅がtextMaxWidthを超えるとき、判定1行終わり、高さ調整の判定値を配列に追加。
                        heightPlus += maxSize - 15;
                        this.heightPlusArray.push(heightPlus); textWidth = 0; maxSize = nowSize;
                    }
                    textWidth += charWidth;
                }
                count++;
            }
            heightPlus += maxSize - 15;
            this.heightPlusArray.push(heightPlus);  //全ての文字を表示した後の、最後の段落判定
        }
    }

    updateText(context) { //表示テキストを1文字ずつ追加するメソッド
        if(!this.rubyX) { //ふりがな描画モードでないなら、通常の文字の処理
          const char = this.currentMessageText.charAt(this.textNumber); //このアップデートで表示するべき1文字を取り出す
          const frameSkip24 = ["。", "?", "…"]; //この後に表示間隔を24フレーム開ける文字列を定義(0.4秒)
          const frameSkip12 = ["、"]; //この後に表示間隔を12フレーム開ける文字列を定義(0.2秒)
          if( frameSkip24.indexOf(char) > -1 ) {this._timeCount = 24;} //現在の文字が、その文字列のいずれかと一致した場合24フレーム開ける
          else if( frameSkip12.indexOf(char) > -1 ) {this._timeCount = 12;}

          if(char === "#") { this.textNumber++; //取り出した文字が#の場合、次の一文字を調べる。#の直後に特定の文字列だった場合に、対応する関数を記述
            const char2 = this.currentMessageText.charAt(this.textNumber);
            if(char2 === "n") { this.line++; this.nowTextWidth = 0; } //"#n"で、自動的に改行する。段落を変更したら、これまでのテキスト幅は0に。
            else if(char2 === "<") { this.size += 3; this.rubySize += 1; } /* "#<"でフォントサイズを3大きく、ふりがなを1大きくする*/
            else if(char2 === ">") { this.size -= 3; this.rubySize -= 1; } // "#>"でフォントサイズを3小さく、ふりがなを1小さくする
            else if(char2 === "=") { this.size = 15; this.rubySize = 6; } // "#="でフォントサイズを元の大きさにする
            else if(char2 === "^") { this.heightPlus -= 3; } // "#^"でフォント位置を上に3ずらす
            else if(char2 === "v") { this.heightPlus += 3; } // "#v"でフォント位置を下に3ずらす
            else if(char2 === "r") { this.color = "#c64";} //"#r"でフォント色を赤に
            else if(char2 === "b") { this.color = "#555";} //"#b"でフォント色を元の黒いグレーに戻す
            else if(char2 === ".") { this._timeCount = 12; } //"#."で次の文字の表示ラグを12フレーム(1/5秒)開ける
            else if(char2 === "[") { this.textNumber++; //ふりがなを宛てる開始位置(ふりがなモードON) 例:振仮名#[3,ふりがな]という記述を想定している
                const char3 = this.currentMessageText.charAt(this.textNumber); //[の次は、ふりがな宛て先の「漢字文字数」が指定されている。この要素は数字。!isNaN(char)
                this.rubyX = char3; this.textNumber++; //以後、今回のふりがなモードではthis.rubyXが漢字(宛先)の文字数を表す
            }
            else if(char2 === "#") {this.renderText(context, char2);} //##で続く場合、2文字目の#を普通に描画する
          }
          else {this.renderText(context, char);} //#でないなら、取り出した1文字を普通に描画する
          this.textNumber++; //描画処理が終わったら、表示テキスト番号を次のカウントに振る
       }
       else if(this.rubyX) {//ふりがな描画モードなら、ふりがな専用の処理を適用
       let rubyStr = ""; //rubyStrという要素に、先の"ふりがな"文字列を格納する
         for(let count = 0; count < 31; count++) { //さすがに31文字以上の「ふりがな」は無いだろう。"]"で処理を終了するし
           const char = this.currentMessageText.charAt(this.textNumber);
           this.textNumber++;
           if(char === "]") {break;} //"]"でふりがなモードを終了。それ以外ならふりがな一文字を追加して次のふりがなへ
           rubyStr += char; this.ruby++;
           }
         this.renderRuby(context, rubyStr); //ふりがなを描画するメソッド
         this.rubyX = false; this.ruby = 0; //描き終わった後の、ふりがなモードを終了(リセット)するための記述
       }
    }

    clearRendering(target) { //___描画領域をクリアする
        const context = target.getContext('2d');
        const Y = this.windowY - this.nameHeight - this.margin;
        const width = this.windowWidth + this.margin*2;
        const height = this.windowHeight + this.margin*2 + this.nameHeight;
        context.clearRect(0, Y, width, height);  //名前表示&テキストスペースクリア
        context.clearRect(screenCanvasWidth - 200, 26, 200, 360); //キャラクター立ち絵領域をクリア
    }
    renderingMessageBoard(context) { //最初にメッセージボードを描画する
        context.fillStyle = 'rgba(255,255,255,0.99)'; //塗りつぶす色は白';
        context.strokeStyle = 'rgba(125,125,255,0.99)'; //枠は青っぽい
        context.fillRect(this.windowX, this.windowY, this.windowWidth, this.windowHeight);
        context.strokeRect(this.windowX, this.windowY, this.windowWidth, this.windowHeight);
    }
    renderingBoardClear(context) { //メッセージボードをリセットする(テキスト領域のみクリア)
        context.fillStyle = 'rgba(255,255,255,0.99)'; //塗りつぶす色は白';
        context.clearRect(this.windowX + this.margin, this.windowY + this.margin, this.windowWidth - this.margin*2, this.windowHeight- this.margin*2);
        context.fillRect(this.windowX + this.margin, this.windowY + this.margin, this.windowWidth - this.margin*2, this.windowHeight- this.margin*2);
    }
    renderingName(context) { //会話の最初に名前を描画する関数
        context.font = `${this.size}px ${this.fontStyle}`;
        const nameWidth = context.measureText(this.currentMessage.name).width; //名前表示の文字列の長さを取得
        if(!nameWidth) {return;} //名前がないなら表示しない

        const width = nameWidth + this.paddingLeft*2;
        const height = this.nameHeight + this.margin; //this.nameHeightは、constructor内にて30に設定
        context.fillStyle = 'rgba(255,255,255,1.0)'; //塗りつぶす色は白
        context.strokeStyle = 'rgba(125,125,255,0.99)'; //枠は青っぽい
        context.fillRect(this.windowX, this.windowY - this.nameHeight, width, height);
        context.strokeRect(this.windowX, this.windowY - this.nameHeight, width, height - this.margin);
        context.fillRect(this.windowX+1, this.windowY -1, width - 2, 2); //白枠の延長

        context.fillStyle = "#063";
        const textX = this.windowX + this.paddingLeft; //テキスト描画位置のX座標 =「枠の左端から20」をカウント
        const textY = this.windowY - 5; // Y座標 =「枠の上端から5上にカウント
        context.fillText(this.currentMessage.name, textX, textY); //テキスト描画の関数本体
    }
    renderingCharactor(context) { //立ち絵表示
        const sprite = this._currentMessage.illust;
        if(sprite === undefined) {this.textMaxWidth = 472; return;} //立ち絵がない時はテキスト表示の最大幅を広げる
        this.textMaxWidth = 332; //テキスト表示の最大幅を調整
        context.drawImage(sprite.image, //ここからsprite画像の描画
            sprite.x, sprite.y,
            sprite.width, sprite.height,
            screenCanvasWidth - sprite.width, 0, // アクターの描画位置を、スクローラーの座標分ずらして調整
            sprite.width, sprite.height); //sprite画像ここまで
    }

    renderText(context, char) { //ここからテキスト描画メソッド
        const nextTextWidth = this.nowTextWidth + context.measureText(char).width; //テキスト幅を更新した後の値を先読み
        if( nextTextWidth > this.textMaxWidth ) {  //表示するテキスト幅がtextMaxWidthを超えるとき、自動的に改行する。
            this.line++; this.nowTextWidth = 0; //段落を変更したら、これまでのテキスト幅は0に。
        }

        context.font = `${this.size}px ${this.fontStyle}`;
        context.fillStyle = `${this.color}`;
        if(this.nowTextWidth === 0 && this.heightPlusArray) { this.heightPlus += this.heightPlusArray[this.line]; } //段落最初に判定、この行の最大文字サイズで、表示位置の高さを調整
        //1文字毎にテキストを描画
        const textX = this.windowX + 20 + this.nowTextWidth; //テキスト描画位置のX座標 =「枠の左端から20離す」に、これまでのテキスト幅をカウント
        const textY = this.windowY + 30 + this.lineHeight * this.line + this.heightPlus; // Y座標 =「枠の上端から30開ける」に、現在の段落*段落分の高さをカウント
        context.fillText(char, textX, textY); //テキスト描画の関数本体
        this.nowTextWidth += context.measureText(char).width; //表示テキスト幅に現在の文字の幅分を追加
    }
    renderRuby(context, char) { //ふりがなを描画するメソッド
        context.font = `${this.rubySize}px ${this.fontStyle}`;
        context.fillStyle = `${this.color}`;
        const rubyHiraganaWidth = this.rubySize * this.ruby; //ふりがなの描画の幅(描画位置の調整に必要な値)
        const rubyTextWidth = this.rubyX * this.size; //ふりがな宛先のテキスト幅(描画位置の調整に必要な値2)
        const rubyRelativeX = (rubyTextWidth - rubyHiraganaWidth) * 0.5 - rubyTextWidth; //ルビ描画位置のX軸方向の調整値を計算
        const textX = this.windowX + 20 + this.nowTextWidth + rubyRelativeX; //テキスト描画位置のX座標 =「枠の左端から20離す」に、これまでのテキスト幅をカウントし、調整幅分だけ左にずらす
        const textY = this.windowY + 30 + this.lineHeight * this.line + this.heightPlus - this.size + 1; // Y座標 =「枠の上端から30開ける」に、現在の段落*段落分の高さをカウント
        context.fillText(char, textX, textY ); //テキスト描画の関数本体、ふりがな用に描画位置を調整している
    }


    update(gameInfo, input, touch, target) { //毎フレーム呼び出されるupdateメソッド。このクラスのプログラム動作の本体
        this.playerIsStay(); //メッセージウィンドウが存在する限り、プレイヤー操作を止める
        const context = target.getContext('2d');
        if(!this.inited){ //会話フェーズが切り替わるならウィンドウ枠全体の初期化
            this.clearRendering(target);
            this.renderingMessageBoard(context);
            this.renderingName(context);
            this.renderingCharactor(context);
            this.messageSizeCheck(context);
            this.inited = true;
            this.initedText = true;
            return;
        }
        if(!this.initedText){ //メッセージが切り替わるなら、テキスト表示を初期化してテキストサイズの調整チェック
            this.renderingBoardClear(context);
            this.renderingCharactor(context);
            this.messageSizeCheck(context);
            this.initedText = true;
            return;
        }
        if( this.currentMessageText.length < this.textNumber) { //現在の会話の文字数すべて表示されてるなら
            if(input.getKey(' ') || touch.touch) {  //スペースキーorタッチを押した時に
                this.currentMessageText = this._currentMessage.text.shift(); // 次のメッセージに移行
            }
        }
        else if( this._timeCount === 0 ) {
            this.updateText(context);
            if( (input.getKey(' ') || touch.touch) && this.textNumber > 3) { let count = 0; //スペースキーorタッチで一度に最大10文字まで更新、会話更新のボタンと被るので、最初の3文字まではスキップしない。
                while( count < 5 && (input.getKey(' ') || touch.touch) && this._timeCount == 0 && this.currentMessageText.length >= this.textNumber) {
                    this.updateText(context); count++;
                }
                if(this._timeCount > 0) { this._timeCount >> 1; } //スペースキーが押されてるなら、タイムラグを半分の時間(端数切り捨て)に
            }
        }
        else if(this._timeCount > 0) {this._timeCount--;}
    }
}
そいや、メッセージウィンドウはどちらかというと映像デモに近い感じ。レスポンスや速さももちろんですが、如何に心地よく表示できるか、演出するか、というところに重きを置いたような気がします。 ちょいと描画の特殊効果みたいになると、描画システムそのものに触れないといけないので難易度が跳ね上がるのですが、これくらいならまぁ何とか。
まずはゲームシステム全体の完成を目指して、その後に詰めるのが良いのかなぁ...(続く
次 ⇒ JavaScriptでゲーム作り「17:canvas描画を最適化する」
古都さんのフレームワークを元にほぼ最初から作ってます。
たぶん順番に見ないとちんぷんかんぷん(' '*)...
すぺしゃるさんくす
https://sbfl.net/古都さん
JavaScriptで作る弾幕STGの基礎(フレームワーク)を使わせていただいてます。感謝!
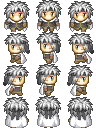
ぴぽやさんもありがとう、キャラチップをお借りしています。