11:多角形を使った魔法陣の当たり判定と描画
今回は、複数の線分(Line)を使って、多角形を実装してみようと思います。⇒ 多角形を使った魔法陣のデモを見る
多角形クラスを実装する
(2019.4.30執筆)
6項にて、線分クラスの実装を行いました。この線分を組み合わせることで、三角形から五角形、六角形など、色んな図形を描けるようになります。しかも回転させたりとかもできる。 多角形のクラスを定義するにはちょとコツがあって、まず中心となる座標を決めます。その座標から相対的な位置関係を図った点を決めて、それらを結ぶように複数のLineを引く。 すると、中心座標を移動するだけで図形が平行移動できるようになるし、回転させるにも中心座標が定まってるので扱いやすい感じです。今回は難易度の高かった曲線クラスの実装後なので、かなり簡単に感じてしまった。説明がいつもより簡略化されてます。。
実装ポイント
- 中心座標を決める
- Lineを結ぶ複数の点は、中心座標からの相対位置で定義する
大まかな手順
- 多角形クラス(collider)を定義する
- 当たり判定をテストする
- 多角形クラスのアクターを作る
- 図形を描いてみる
では行ってみます(' '*)
多角形クラス(collider)を定義する
class Polygon extends Collider { //当たり判定を複数の線分で使う多角形クラス
  constructor(x, y, lines=[], tag) { //中心点(x,y)の座標と、複数の線分を持つ多角形の定義
    super('polygon', x, y, tag);
    this.lines = lines;
  }
  get cx() { return this.x; } //複数のコリジョンの中心となるX座標、矩形と同様にcxでも取得できるように
  get cy() { return this.y; } //複数のコリジョンの中心となるY座標、矩形と同様にcyでも取得できるように
  get yMin() { let yMin = 0;
      for (let line of this.lines) {
          if (yMin > line.top) {yMin = line.top;}
      } return yMin;
  }
  get yMax() { let yMax = 0;
      for (let line of this.lines) {
          if (yMax < line.bottom) {yMax = line.bottom;}
      } return yMax;
  }
  get xMin() { let xMin = 0;
      for (let line of this.lines) {
          if (xMin > line.left) {xMin = line.left;}
      } return xMin;
  }
  get xMax() { let xMax = 0;
      for (let line of this.lines) {
          if (xMax < line.right) {xMax = line.right;}
      } return xMax;
  }
  get top() {  return this.y + this.yMin; } // 四分木の空間登録で使う
  get bottom() { return this.y + this.yMax; } // 同上
  get left() { return this.x + this.xMin; } // 同上
  get right() { return this.x + this.xMax; } // 同上

  get aabbRect() { return new Rectangle(this.left, this.top, this.right - this.left, this.bottom - this.top); } //hitTestの最初のaabb判定に使う
}
さて、これは複数のLine(collider)を格納したLinesの定義です。別に多角形じゃなくて、線分の集合体みたいなイメージ。 このクラスがあれば、いくつもの直線を使ったどんな形もカバーできます。
当たり判定を行うのに、aabb矩形を抜き出す必要があるので、線分の一番topにくるy座標と、bottomのy座標、leftのx座標、rightのx座標を計算する必要がある感じです。 これはlineが格納されてる配列を参照して、それぞれのtopから最小となる値を抜き出す、bottomなら最大となる値を抜き出す。という流れで、最終的なaabb矩形の範囲を求めています。
多角形クラスの当たり判定を実装する
では次に、このクラスの当たり判定を見てみます。
  deRectPolygon(rect, polygon) {
    if( !this.deRectRect(rect, polygon.aabbRect) ) {return false;} //aabb判定で当たってないならfalse
    const hitLines = []; // hitした多角形の辺(線分)のリストを格納
    for (let line of polygon.lines) { // 1辺ずつhitTestする
        const offsetLine = new Line(line.x + polygon.x, line.y + polygon.y, line.x1 + polygon.x, line.y1 + polygon.y); // polygonの中心座標の位置に合わせてオフセット
        if( this.deRectLine(rect, offsetLine) ) { hitLines.push(offsetLine); } //当たったらリストに追加
    }
    if (hitLines.length > 0) { return hitLines; } //リストに1辺でもあれば、当たったリストを返す(判定true)
    return false; // 無いなら当たってないfalse
  }
基本となる矩形と、多角形との当たり判定を描いてみました。
まずaabb矩形で判定をとって、falseなら判定終了です。計算の無駄が省けます。
でaabb矩形の範囲内なら、線分クラスを格納した配列を参照し、それぞれの線分と判定を取っていきます。 あ、その前に、配列に格納された線分の座標は、多角形クラスの中心座標からの相対位置なので、判定前に絶対座標にオフセットするのを忘れずに行います。 それから1本1本の線分と当たり判定をとって、当たった線分のリスト(絶対座標)を返すような感じです。
後のバウンド処理で、当たった線分の情報が法線ベクトルを割り出すのに役立ちます。
多角形クラスのアクターを作る
多角形クラスにも色んな形があるので、まず基礎となる多角形クラスの大元を作ってみたいと思います。多角形クラスの大元
class PolygonActor extends Actor { // 多角形の元になるアクタークラス。これをシーンには登録しない
  constructor(x, y, lines=[], hitArea, tag) {
    super(x, y, hitArea, tag);
    this.lines = lines;
    this._color = null;
    this.addEventListener('hit', (e) => this._color = 'rgba(0, 255, 0, 0.9)' );
  }

  update(gameInfo, input) {
    this._color = 'rgba(255, 255, 255, 0.7)';
  }
  render(target, scroller) {
    const context = target.getContext('2d');
    context.strokeStyle = this._color;
    context.lineWidth = 2;
    for (let line of this.lines) {
        context.beginPath(); //描画位置の初期化
        context.moveTo(line.x + this.x + scroller.x, line.y + this.y + scroller.y); //ラインの始点座標
        context.lineTo(line.x1 + this.x + scroller.x, line.y1 + this.y + scroller.y); //ラインの終点座標
        context.stroke(); //軌道に沿って線を引く
    }
    context.lineWidth = 1;
    context.beginPath(); //ここから範囲円も可視化してみる。
    context.arc(this.x + scroller.x, this.y + scroller.y, this.length, 0, Math.PI*2, false);
    context.stroke(); //軌道に沿って線を引く
  }
}
星形クラス(Actor)の実装
class StarActor extends PolygonActor { // 星の魔法陣
  constructor(x, y, length, tag) {
    const r1 = -0.5*Math.PI;
    const r2 = 0.7*Math.PI;
    const r3 = -0.1*Math.PI;
    const r4 = -0.9*Math.PI;
    const r5 = 0.3*Math.PI;

    const lines = [
        new Line(length*Math.cos(r1), length*Math.sin(r1), length*Math.cos(r2), length*Math.sin(r2) ),
        new Line(length*Math.cos(r2), length*Math.sin(r2), length*Math.cos(r3), length*Math.sin(r3) ),
        new Line(length*Math.cos(r3), length*Math.sin(r3), length*Math.cos(r4), length*Math.sin(r4) ),
        new Line(length*Math.cos(r4), length*Math.sin(r4), length*Math.cos(r5), length*Math.sin(r5) ),
        new Line(length*Math.cos(r5), length*Math.sin(r5), length*Math.cos(r1), length*Math.sin(r1) )
    ];
    const hitArea = new Polygon(0, 0, lines);
    super(x, y, lines, hitArea, ['element']);
    this.length = length;
  }
}
星形クラス(Actor)の雛形です。正五角形となる点座標を相対位置で定義して、あ、このとき中心座標からの距離はlengthで指定できるようにしています。 で、5点を星形となるよう順番に結んでいきます。this.linesに配列で格納。OK。
では、実際にシーンに追加してみましょう。
メインシーンに追加する
class MainScene extends Scene {
    constructor(renderingTarget) {
        super('メイン',  512, 384, 'black', renderingTarget);
        const npc = new NPC(150, 100);
        this.add(npc);
        this.add(global.player);

        const star1 = new StarActor (200, 200, 50, 1);
        this.add(star1);
    }
}
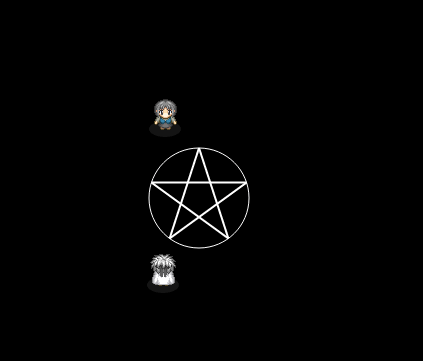
⇒ 星型クラスのデモを見る
いい感じです。ラインに触れたら当たり判定も反応します。OK。
六芒星クラス(Actor)の実装
続いて六芒星を描いてみます(' '*)
class HexagramActor extends PolygonActor { // 星の魔法陣
  constructor(x, y, length, tag) {
    const r1 = -3/6*Math.PI;
    const r2 = 1/6*Math.PI;
    const r3 = 5/6*Math.PI;
    const r4 = 3/6*Math.PI;
    const r5 = -1/6*Math.PI;
    const r6 = -5/6*Math.PI;

    const lines = [
        new Line(length*Math.cos(r1), length*Math.sin(r1), length*Math.cos(r2), length*Math.sin(r2) ),
        new Line(length*Math.cos(r2), length*Math.sin(r2), length*Math.cos(r3), length*Math.sin(r3) ),
        new Line(length*Math.cos(r3), length*Math.sin(r3), length*Math.cos(r1), length*Math.sin(r1) ),
        new Line(length*Math.cos(r4), length*Math.sin(r4), length*Math.cos(r5), length*Math.sin(r5) ),
        new Line(length*Math.cos(r5), length*Math.sin(r5), length*Math.cos(r6), length*Math.sin(r6) ),
        new Line(length*Math.cos(r6), length*Math.sin(r6), length*Math.cos(r4), length*Math.sin(r4) ),
    ];
    const hitArea = new Polygon(0, 0, lines);
    super(x, y, lines, hitArea, ['element']);

    this.length = length;
  }
}
配列内に定義した、線を引く順序と繋ぎ方がポイントですね。
では、実際にシーンに追加してみましょう。
メインシーンに追加する
class MainScene extends Scene {
    constructor(renderingTarget) {
        super('メイン',  512, 384, 'black', renderingTarget);
        const npc = new NPC(150, 100);
        this.add(npc);
        this.add(global.player);

        const hexa1 = new HexaActor (200, 200, 50, 1);
        this.add(hexa1);
    }
}
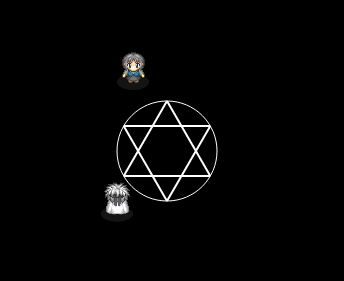
⇒ 六芒星クラスのデモを見る
こちらも無事にできました。
多角形を回転させる
では発展編。多角形の回転に取り組んでみます。 知らないので回転後の座標はどう計算するのか?を調べます。出てきました。⇒ 座標平面上における回転の公式 - 具体例で学ぶ数学
回転角度をラジアンで提示してあげたら、この公式が使えそうです。 回転の中心は(0,0)とする必要があるので、linesのそれぞれの線分が中心座標との相対位置で定義してたら回転させやすいです。
座標平面上における回転の公式抜粋
回転後のX座標 = 元のx座標 * Math.cos(θ) - 元のy座標 * Math.sin(θ)
回転後のY座標 = 元のy座標 * Math.cos(θ) + 元のx座標 * Math.sin(θ)
六芒星(回転する)クラスへ改造
試しに六芒星クラスにて実践してみます。 まず、クラスを生成する際に回転角度も入力できるようにします。 その回転角度を要素に格納したら、update毎にlinesに格納されたそれぞれの線分の始点・終点ともに上の公式を使って回転させます。
class HexagramActor extends PolygonActor { // 星の魔法陣
  constructor(x, y, length, rotate, tag) {
    const r1 = -3/6*Math.PI;
    const r2 = 1/6*Math.PI;
    const r3 = 5/6*Math.PI;
    const r4 = 3/6*Math.PI;
    const r5 = -1/6*Math.PI;
    const r6 = -5/6*Math.PI;

    const lines = [
        new Line(length*Math.cos(r1), length*Math.sin(r1), length*Math.cos(r2), length*Math.sin(r2) ),
        new Line(length*Math.cos(r2), length*Math.sin(r2), length*Math.cos(r3), length*Math.sin(r3) ),
        new Line(length*Math.cos(r3), length*Math.sin(r3), length*Math.cos(r1), length*Math.sin(r1) ),
        new Line(length*Math.cos(r4), length*Math.sin(r4), length*Math.cos(r5), length*Math.sin(r5) ),
        new Line(length*Math.cos(r5), length*Math.sin(r5), length*Math.cos(r6), length*Math.sin(r6) ),
        new Line(length*Math.cos(r6), length*Math.sin(r6), length*Math.cos(r4), length*Math.sin(r4) ),
    ];
    const hitArea = new Polygon(0, 0, lines);
    super(x, y, lines, hitArea, ['element']);

    this.length = length;
    this.rotate = rotate;
  }
  update(gameInfo, input) {
    this._color = 'rgba(255, 255, 255, 0.7)';
    for (let line of this.lines) { const r = this.rotate;
        const x = line.x, y = line.y; //ここから始点の座標を回転
        line.x = x*Math.cos(r) - y*Math.sin(r);
        line.y = y*Math.cos(r) + x*Math.sin(r);
        const x1 = line.x1, y1 = line.y1; //ここから終点の座標を回転
        line.x1 = x1*Math.cos(r) - y1*Math.sin(r);
        line.y1 = y1*Math.cos(r) + x1*Math.sin(r);
    }
    this.hitArea.lines = this.lines; //hitAreaに回転後の座標を反映させる
  }
}
メインシーンに追加する
class MainScene extends Scene {
    constructor(renderingTarget) {
        super('メイン',  512, 384, 'black', renderingTarget);
        const npc = new NPC(150, 100);
        this.add(npc);
        this.add(global.player);

        const hexa1 = new HexagramActor (200, 200, 50, 1);
        this.add(hexa1);

        const actorsR = 10;
        for(let i=0; i < actorsR; i++) {
          const x = Math.random() * 512;
          const y = Math.random() * 384;
          const rect = new RectangleActor(x, y, 10, 10);
          this.add(rect);
        }
        const actorsC = 10;
        for(let i=0; i < actorsC; i++) {
          const x = Math.random() * 512;
          const y = Math.random() * 384;
          const circle = new CircleActor(x, y, 5);
          this.add(circle);
        }
    }
}
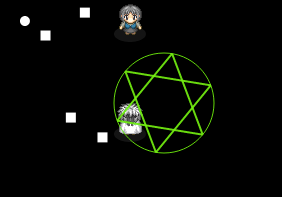
⇒ 六芒星クラス(回転)のデモを見る
ちょい装飾も加えて、画面全体を魔法演出っぽくしました。いい感じですね〜。
多角形クラス(Actor)の大元の見直し&まとめ
回転要素は大元クラスの方に入れ込んでしまいましょう。関数化して必要なときに呼び出すのがいい。
class PolygonActor extends Actor { // 多角形の元になるアクタークラス。これをシーンには登録しない
  constructor(x, y, lines=[], hitArea, rotate=0) {
    super(x, y, hitArea);
    this.lines = lines;
    this._rotate = rotate; //フレーム毎の回転角度
    this._color = null;
    this.addEventListener('hit', (e) => this._color = 'rgba(0, 255, 0, 0.9)' );
  }
  get rotate() {return this._rotate;} //回転角度(ラジアン)を取得
  set rotate(value) { this._rotate = value; //回転角度(ラジアン)が設定されたら、cos(θ)とsin(θ)の値を要素内に格納する
      this.cosR = Math.cos(value); this.sinR = Math.sin(value);
  }

  rotation() { // 線分リストの各座標を、中心座標を基準に回転させる
    for (let line of this.lines) {
        const x = line.x, y = line.y; //ここから始点の座標を回転
        line.x = x*this.cosR - y*this.sinR;
        line.y = y*this.cosR + x*this.sinR;
        const x1 = line.x1, y1 = line.y1; //ここから終点の座標を回転
        line.x1 = x1*this.cosR - y1*this.sinR;
        line.y1 = y1*this.cosR + x1*this.sinR;
    }
    this.hitArea.lines = this.lines; //hitAreaに回転後の座標を反映させる
  }

  update(gameInfo, input) {
    this._color = 'rgba(255, 255, 255, 0.7)';
    if(this.rotate) {this.rotation();} //回転角度が存在するなら、回転させる
  }
  render(target, scroller) {
    const context = target.getContext('2d');
    context.strokeStyle = this._color;
    context.lineWidth = 2;
    for (let line of this.lines) {
        context.beginPath(); //描画位置の初期化
        context.moveTo(line.x + this.x + scroller.x, line.y + this.y + scroller.y); //ラインの始点座標
        context.lineTo(line.x1 + this.x + scroller.x, line.y1 + this.y + scroller.y); //ラインの終点座標
        context.stroke(); //軌道に沿って線を引く
    }
    context.lineWidth = 1;
    context.beginPath(); //ここから範囲円も可視化してみる。
    context.arc(this.x + scroller.x, this.y + scroller.y, this.length, 0, Math.PI*2, false);
    context.stroke(); //軌道に沿って線を引く
  }
}
大元のクラスで、回転角度(θ)が設定された時にcosθ、sinθの値も格納できるようにしてます。get()&set(value)関数がその役目です。Math.cos(θ)とMath.sin(θ)の計算が重いので、回転角度が判ればすぐ値が取り出せるよう、予めthis.cosR、this.sinRに値を格納するようにしてます。これで毎フレームのアップデートが幾分か軽くなるはず。
星形クラス修正
class StarActor extends PolygonActor { // 星の魔法陣
  constructor(x, y, length, rotate, tags=['element']) {
    const r1 = -0.5*Math.PI;
    const r2 = 0.7*Math.PI;
    const r3 = -0.1*Math.PI;
    const r4 = -0.9*Math.PI;
    const r5 = 0.3*Math.PI;

    const lines = [
        new Line(length*Math.cos(r1), length*Math.sin(r1), length*Math.cos(r2), length*Math.sin(r2) ),
        new Line(length*Math.cos(r2), length*Math.sin(r2), length*Math.cos(r3), length*Math.sin(r3) ),
        new Line(length*Math.cos(r3), length*Math.sin(r3), length*Math.cos(r4), length*Math.sin(r4) ),
        new Line(length*Math.cos(r4), length*Math.sin(r4), length*Math.cos(r5), length*Math.sin(r5) ),
        new Line(length*Math.cos(r5), length*Math.sin(r5), length*Math.cos(r1), length*Math.sin(r1) )
    ];
    const hitArea = new Polygon(0, 0, lines);
    super(x, y, lines, hitArea);
    this.tags = tags;
    this.length = length;
    this.rotate = rotate;
  }
}
六芒星クラス修正
class HexagramActor extends PolygonActor { // 星の魔法陣
  constructor(x, y, length, rotate, tags=['element']) {
    const r1 = -3/6*Math.PI;
    const r2 = 1/6*Math.PI;
    const r3 = 5/6*Math.PI;
    const r4 = 3/6*Math.PI;
    const r5 = -1/6*Math.PI;
    const r6 = -5/6*Math.PI;
    const lines = [
        new Line(length*Math.cos(r1), length*Math.sin(r1), length*Math.cos(r2), length*Math.sin(r2) ),
        new Line(length*Math.cos(r2), length*Math.sin(r2), length*Math.cos(r3), length*Math.sin(r3) ),
        new Line(length*Math.cos(r3), length*Math.sin(r3), length*Math.cos(r1), length*Math.sin(r1) ),
        new Line(length*Math.cos(r4), length*Math.sin(r4), length*Math.cos(r5), length*Math.sin(r5) ),
        new Line(length*Math.cos(r5), length*Math.sin(r5), length*Math.cos(r6), length*Math.sin(r6) ),
        new Line(length*Math.cos(r6), length*Math.sin(r6), length*Math.cos(r4), length*Math.sin(r4) ),
    ];
    const hitArea = new Polygon(0, 0, lines);
    super(x, y, lines, hitArea);
    this.tags = tags;
    this.length = length;
    this.rotate = rotate;
  }
}
⇒ 修正後の六芒星クラス(回転)のデモを見る
何回か不具合を修正して、何とか動きました。そんなこんなしてるうちに、これ高速回転すると面白い模様が描けることに気づきました。
回転角度を0.5にする
メインシーンに追加したクラスの値がこうなると...
        const hexa1 = new HexagramActor (200, 200, 50, 0.5);
        this.add(hexa1);
⇒ 高速回転のデモを見る
ラジアン表記で0.5。。。なんと、残像を残して模様が画かれる効果が発見されました。すごいですね〜(' '*)
更に早くすると車輪みたいになります。なにか使えそうな予感がしますね。残像効果なので、目に与える影響とか安全性とかは一考。あんま早くしすぎるのも微妙?
多角形と接触時のバウンス処理
バウンス処理も組んでいます。基本はタグにelemennt(独自の仕様)を付加させてバウンス素通りでもいいと思ってますが、違う用途で使うこともあるので一応。RectActorsBouncerクラスに追記
  otherPolygonBounce(my, polygon, lines) { //線分相手とのバウンス処理
      let speed = my.speed; //反動ベクトルの大きさを定義する。基本はこのアクターの速さ。
      const bounceVect = new Vector2D(0,0);
      for(let line of lines) {
          const delta = line.crossAB(my.hitArea.cx, my.hitArea.cy); // このアクターは、ラインのどちら側に居るか?
          const lineVect = line.bounceVect; //法線ベクトル(衝突時の反動の方向)を定義する文字列。
          if (delta < 0) { lineVect.dx*=-1; lineVect.dy*=-1; } //壁が一方通行でない&&deltaが負のとき、ラインの法線ベクトルを負でとる。
          bounceVect.add(lineVect); //総合的な法線ベクトルに、当たった線分の法線ベクトルを加算
      }
      if ( speed*speed < my.vector.length2 ) { speed = my.vector.length; } //もし自分の移動ベクトルが(押し戻しなどの影響で)自分の速度より大きくなってるなら、移動ベクトルの大きさを反動の大きさとする。
      my._velocityX += speed * bounceVect.dx; //X軸の反動の大きさを反映
      my._velocityY += speed * bounceVect.dy; //Y軸の反動の大きさを反映

      //ここから衝突した多角形の移動ベクトルを反映させるかテスト
      if ( polygon.vector.dx !== 0 || polygon.vector.dy !== 0 ) {//ラインの移動ベクトルが0ではないとき
          if ( polygon.vector.innerP(bounceVect) > 0 ) { // さらに法線ベクトルと、多角形の移動ベクトルの内積が正の値なら、多角形の移動ベクトルも反映。
              my._velocityX += line.vector.dx;
              my._velocityY += line.vector.dy;
          }
      }

      //ここから衝突した多角形の回転を自分に反映させるかテスト
      if ( polygon.rotate ) { //現在の座標から回転の中心座標を引いた値を元に、回転後のvelocityのオフセットを求める
          const dx = my.hitArea.cx - polygon.hitArea.cx, dy = my.hitArea.cy - polygon.hitArea.cy;
          const toX = polygon.hitArea.cx + dx*polygon.cosR - dy*polygon.sinR; //到達点となるx座標の中心地点
          const toY = polygon.hitArea.cy + dy*polygon.cosR + dx*polygon.sinR; //到達点となるy座標の中心地点
          my._velocityX += toX - my.hitArea.cx; //現在の中心座標を差し引いた値がオフセットの値になる
          my._velocityY += toY - my.hitArea.cy; //同上
          my.dir += - polygon.rotate; // 回転分を向きに反映させる
      }
  }
途中までは10項の、線分に対するバウンス処理を元に描きあげました。後は回転分の反映ですね。これは回転の中心と成る座標から自分の中心点の座標までのベクトルを求めて、ベクトルを回転させて、再び回転の中心座標からのベクトルを反映させて、自分の到達地点を求めています。そしてオフセットの値が欲しいので、現在の自分の中心座標を差し引いた値をベロシティに追加してます。ながいですね。
バウンス判定のテスト
⇒ バウンス判定のデモを見る
だいたいこんな感じです(' '*)
後日改善点
翌日、collider判定にもう少し処理を簡略化できる部分があるなと思い、改善してみました。 当たり判定の時にaabb矩形でまず判定するのですが、その都度にyの最小値などを線分リストを辿って求めるのは効率が悪い。aabbの4隅の座標点は、形状を回転させるにしても中心からの半径以内に収まるので、最初に範囲円の半径を指定しておけば、4隅の計算は中心座標から半径の差を求めれば簡単。大幅な処理の削減ができました。多角形クラス(collider)改善後
class Polygon extends Collider { //当たり判定を複数の線分で使う多角形クラス
  constructor(x, y, circleRadius, lines=[]) { //中心点(x,y)の座標を元にした、複数の線分を持つ多角形の定義。circleRadiusも指定すれば、円も含まれる
    super('polygon', x, y);
    this.radius = circleRadius; //このクラスのhitTestの範囲を円の半径で表す
    this.lines = lines;
  }
  get cx() { return this.x; } //複数のコリジョンの中心となるX座標、矩形と同様にcxでも取得できるように
  get cy() { return this.y; } //複数のコリジョンの中心となるY座標、矩形と同様にcyでも取得できるように

  get top() {  return this.y - this.radius; } // 四分木の空間登録で使う
  get bottom() { return this.y + this.radius; } // 同上
  get left() { return this.x - this.radius; } // 同上
  get right() { return this.x + this.radius; } // 同上

  get aabbRect() { return new aabbRect(this.left, this.top, this.right, this.bottom); } //hitTestの最初のaabb判定に使う
}
非常に簡単になりましたね(' '*)
あとはActorの方もこれに合わせて...
星形クラス修正
class StarActor extends PolygonActor { // 星の魔法陣
  constructor(x, y, length, rotate, tags=['element']) {
    const r1 = -0.5*Math.PI;
    const r2 = 0.7*Math.PI;
    const r3 = -0.1*Math.PI;
    const r4 = -0.9*Math.PI;
    const r5 = 0.3*Math.PI;

    const lines = [
        new Line(length*Math.cos(r1), length*Math.sin(r1), length*Math.cos(r2), length*Math.sin(r2) ),
        new Line(length*Math.cos(r2), length*Math.sin(r2), length*Math.cos(r3), length*Math.sin(r3) ),
        new Line(length*Math.cos(r3), length*Math.sin(r3), length*Math.cos(r4), length*Math.sin(r4) ),
        new Line(length*Math.cos(r4), length*Math.sin(r4), length*Math.cos(r5), length*Math.sin(r5) ),
        new Line(length*Math.cos(r5), length*Math.sin(r5), length*Math.cos(r1), length*Math.sin(r1) )
    ];
    const hitArea = new Polygon(0, 0, length, lines);
    super(x, y, lines, hitArea);
    this.tags = tags;
    this.length = length;
    this.rotate = rotate;
  }
}
六芒星クラス修正
class HexagramActor extends PolygonActor { // 星の魔法陣
  constructor(x, y, length, rotate, tags=['element']) {
    const r1 = -3/6*Math.PI;
    const r2 = 1/6*Math.PI;
    const r3 = 5/6*Math.PI;
    const r4 = 3/6*Math.PI;
    const r5 = -1/6*Math.PI;
    const r6 = -5/6*Math.PI;
    const lines = [
        new Line(length*Math.cos(r1), length*Math.sin(r1), length*Math.cos(r2), length*Math.sin(r2) ),
        new Line(length*Math.cos(r2), length*Math.sin(r2), length*Math.cos(r3), length*Math.sin(r3) ),
        new Line(length*Math.cos(r3), length*Math.sin(r3), length*Math.cos(r1), length*Math.sin(r1) ),
        new Line(length*Math.cos(r4), length*Math.sin(r4), length*Math.cos(r5), length*Math.sin(r5) ),
        new Line(length*Math.cos(r5), length*Math.sin(r5), length*Math.cos(r6), length*Math.sin(r6) ),
        new Line(length*Math.cos(r6), length*Math.sin(r6), length*Math.cos(r4), length*Math.sin(r4) ),
    ];
    const hitArea = new Polygon(0, 0, length, lines);
    super(x, y, lines, hitArea);
    this.tags = tags;
    this.length = length;
    this.rotate = rotate;
  }
}
以上でOKです。
では、次回はこれまでのコードの整理をして、さらに動作コストが軽くなるよう見直していきたいと思います。
⇒ JavaScriptでゲーム作り「12:キャッシュの扱い方と計算処理の高速化」
古都さんのフレームワークを元にほぼ最初から作ってます。
たぶん順番に見ないとちんぷんかんぷん(' '*)...
すぺしゃるさんくす
https://sbfl.net/古都さん
JavaScriptで作る弾幕STGの基礎(フレームワーク)を使わせていただいてます。感謝!
ぴぽやさんもありがとう、キャラチップをお借りしています。